Description
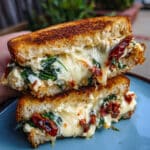
Elevate your grilled cheese game with this gourmet Sun Dried Tomato Spinach and Ricotta Grilled Cheese! Creamy ricotta mixed with sweet sun-dried tomatoes, fresh spinach, and garlic, all melted together with gooey mozzarella between buttery, golden-brown bread. It’s the grown-up grilled cheese you didn’t know you needed—quick, easy, and absolutely delicious!
Ingredients
For the Sandwiches:
- 8 slices bread (sourdough, Italian, or your favorite sturdy bread—I love a good crusty sourdough!)
- 1 cup fresh spinach, roughly chopped (baby spinach works perfectly)
- ½ cup sun-dried tomatoes, chopped (the kind packed in oil is a game-changer; just drain them slightly)
- 1 cup ricotta cheese (whole milk ricotta gives the creamiest results)
- 1½–2 cups shredded mozzarella or provolone (or do half and half for extra flavor!)
- 1–2 cloves garlic, minced (fresh is best, but ¼ teaspoon garlic powder works in a pinch)
- 2–3 tablespoons olive oil (if you’re using oil-packed sun-dried tomatoes, use some of that flavorful oil)
- 2–4 tablespoons unsalted butter, room temperature (soft butter spreads so much easier!)
Optional but wonderful:
- Pinch of red pepper flakes (for a little kick)
- Black pepper to taste
- Italian seasoning (about ½ teaspoon adds lovely herby notes)
Instructions
In a small bowl, combine the ricotta cheese, chopped sun-dried tomatoes, and minced garlic. Mix them together until everything is well incorporated. The ricotta should be speckled with ruby-red tomato pieces and smell absolutely heavenly. Fold in the chopped spinach until it’s evenly distributed throughout. Season with a pinch of black pepper and add red pepper flakes or Italian seasoning if you want extra warmth and flavor.
Spread softened butter evenly on one side of each bread slice. Make sure you get all the way to the edges—those buttery corners are the crispiest, most delicious part! This is the outside of your sandwich, so be generous. If your butter is too cold and tearing the bread, let it sit at room temperature for a few more minutes.
Place the bread slices butter-side down on a clean cutting board or work surface. On the unbuttered side, spread a generous layer of your ricotta mixture. Don’t be stingy here—you want about ¼ cup of filling per sandwich. Top with a nice handful of shredded mozzarella or provolone, dividing it evenly among four sandwiches. Place another slice of bread on top, butter-side up.
Heat a large skillet or griddle over medium heat. This is important—medium heat, not high! You want the bread to turn golden and crispy while giving the cheese plenty of time to melt. If the heat is too high, you’ll end up with burnt bread and cold cheese in the middle.
Place your assembled sandwiches butter-side down in the hot skillet. You should hear a gentle sizzle—that’s the sound of perfection happening. Cook for 3–4 minutes without moving them around. Resist the urge to peek too early!
Here comes the moment of truth! Carefully flip each sandwich using your spatula. The bottom should be gorgeously golden and crispy. Cook the second side for another 3–4 minutes, pressing gently with your spatula to help the cheese melt and the layers meld together. When both sides are crispy and golden, and you can see melted cheese just starting to peek out the sides, they’re ready!
Transfer your grilled cheese to a cutting board and let them rest for just a minute or two. I know it’s hard to wait, but this helps the filling set slightly so it doesn’t all ooze out when you cut them. Slice diagonally (because diagonal always tastes better, doesn’t it?) and serve immediately while they’re hot and melty.
Notes
- Don’t overstuff – It’s tempting to pile on the filling, but too much makes the sandwich hard to flip and messy to eat (use about ¼ cup filling per sandwich)
- Grate your own cheese – Pre-shredded cheese has anti-caking agents that prevent it from melting as smoothly; freshly grated melts like a dream
- Try mayo instead of butter – Spread a thin layer of mayonnaise on the outside of the bread instead of butter for an incredibly crispy, golden crust (trust me on this one!)
- Use a panini press – If you have one, this is perfect for getting crispy, evenly browned sandwiches with minimal effort
- Prep Time: 10 minutes
- Cook Time: 8 minutes
- Category: Lunch
- Method: Pan-fried
- Cuisine: Italian-American