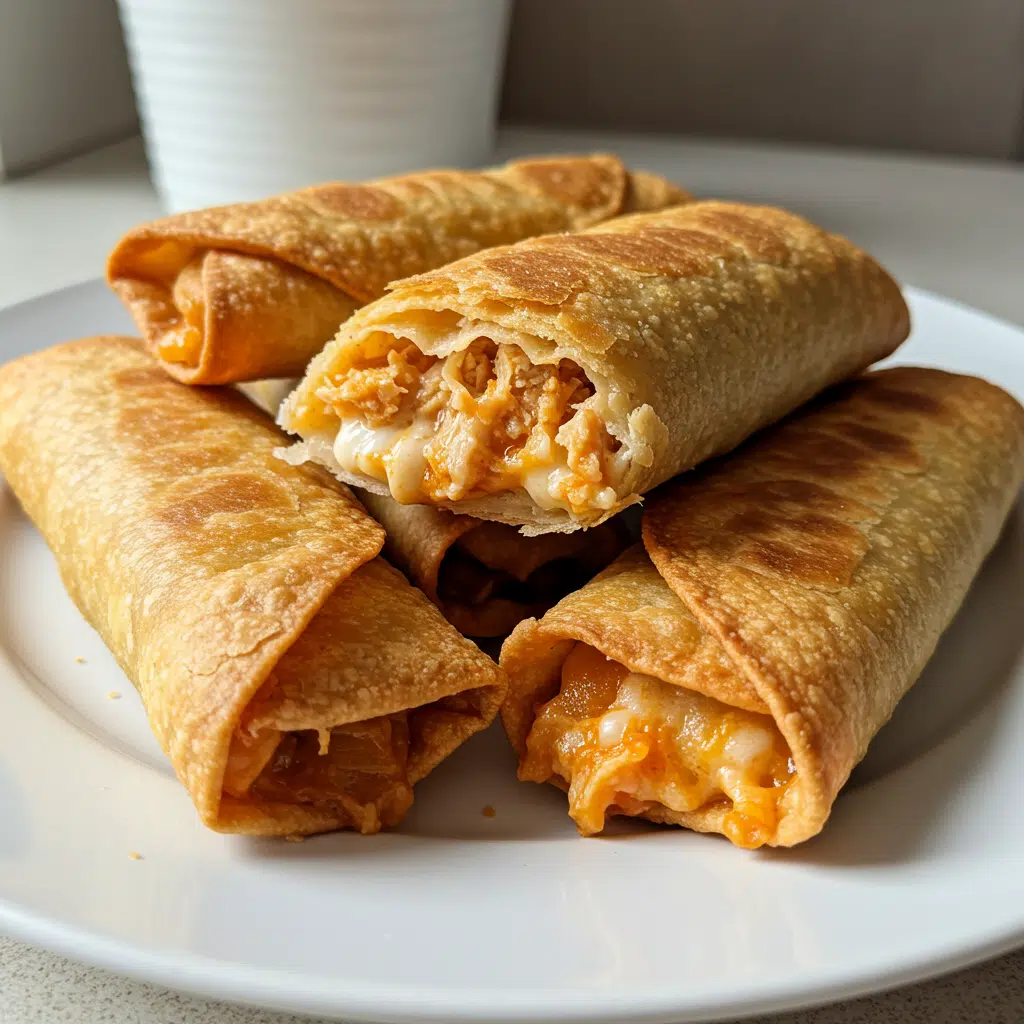
Chicken Chimichangas are made with large flour tortillas stuffed with shredded chicken, beans, cheese, salsa, and warm spices, then rolled up and fried or baked until golden and crispy. Topped with sour cream, guacamole, and extra salsa, this Mexican-inspired dish is hearty, flavorful, and absolutely irresistible. Perfect for weeknight dinners, parties, or anytime you’re craving something fun and delicious!
Love More Dinner Ideas? Try My Seafood Stuffed Shells or this Garlic Parmesan Chicken Pasta next.

Why You’ll Love This Recipe
Crispy, cheesy, and packed with flavor, these chimichangas strike the perfect balance of seasoned chicken, creamy beans, and melty cheese inside a golden tortilla. They’re quick to make in just 30 minutes, making them ideal for busy weeknights when you want something satisfying without extra effort. With their irresistible texture and bold Mexican-inspired flavors, they’re a true dinnertime game-changer.
Print
Crispy Chicken Chimichangas
- Total Time: 30 minutes
- Yield: 6 servings
Description
Homemade crispy chicken chimichangas on a regular dinner plate with store-bought salsa, sour cream, and guacamole, one cut open showing the melted cheese and chicken filling.
Ingredients
For the Filling:
- 2 cups cooked chicken, chopped or shredded
- 1 can (about 15 oz) refried beans
- ½ cup salsa (your preferred type)
- 1 teaspoon ground cumin
- ½ teaspoon dried oregano (crushed)
- 1 teaspoon chili powder
- 1 cup shredded cheese (cheddar or Mexican cheese blend)
- 2 green onions, chopped
For Assembly:
- 6 large flour tortillas
- 3 tablespoons oil (vegetable or canola)
Optional Toppings:
- Salsa
- Sour cream
- Guacamole
Instructions
If you’re starting with raw chicken, just cook it however. I usually throw it in a pan with some salt and cook it until it’s not pink anymore. Nothing fancy.
Most of the time I use rotisserie chicken because I’m lazy and it’s already cooked. Just pull the meat off and shred it up. The kids like bigger chunks so I don’t go crazy making it perfect.
Dump everything in your bowl. Chicken, beans, salsa, cheese, green onions, all the spices. Stir it around until it looks mixed.
I usually stick my finger in and taste it at this point. Sometimes it needs more salsa, sometimes more cheese. Depends on what kind of day I’m having.
The mixture should stick together but not be soupy. If it’s too wet, throw in more cheese. If it’s too dry, add more salsa. There’s no exact science here.
This is the annoying part but you’ll figure it out. Put maybe half a cup of filling right in the middle of each tortilla. Don’t go nuts with the filling or they’ll explode when you cook them. I learned this the messy way.
Fold the bottom up first, then the sides, then roll it up tight. Try to keep the seam on the bottom so it doesn’t unroll itself.
If your tortillas are being jerks and cracking, microwave them for like 20 seconds first. My mom taught me this and it actually works.
I usually bake them because frying makes my kitchen smell like oil for three days and I’m too old for that nonsense. But fried ones are crispier if you care about that.
Baked Version: Oven to 400 degrees. Put them on a cookie sheet seam-side down so they don’t fall apart. Brush oil all over them – don’t skip this part or they’ll be sad and not crispy.
Bake for maybe 25 minutes until they look golden. I check them at 20 minutes because my oven runs hot and burns everything.
Pan-Fried Version: Heat oil in your pan over medium heat. Not too hot or the outside burns before the inside heats up. Put them in seam-down first.
Don’t try to flip them right away or they’ll fall apart. Let them get golden on one side first, then turn them. Takes maybe 8 minutes total if you keep turning them.
Serve them while they’re hot. We put out bowls of salsa, sour cream, and guacamole. Sometimes I make rice if I’m feeling ambitious, but usually they’re filling enough by themselves.
Let them sit for a minute before biting into them unless you want to burn your tongue. The filling gets ridiculously hot and I always forget this.
Notes
Roll them tight but don’t hulk-smash them or the tortilla rips. It’s like wrapping a present – firm but gentle.
When you’re frying them, don’t flip too early. I know you want to peek but let them get golden first or they’ll stick to the pan and make a mess.
Don’t overstuff them. I know it’s tempting to use all the filling but less is more here. You want to actually be able to roll them up.
Make extra and freeze them. Wrap each one in plastic wrap and throw them in a freezer bag. Future you will thank present you when you’re staring at the fridge at 5 PM with no dinner plan.
- Prep Time: 10 minutes
- Cook Time: 20 minutes
- Category: Main Dish
- Method: Pan-fried or Baked
- Cuisine: Mexican-American
Ingredient List
For the Filling:
- 2 cups cooked chicken, chopped or shredded
- 1 can (about 15 oz) refried beans
- ½ cup salsa (your preferred type)
- 1 teaspoon ground cumin
- ½ teaspoon dried oregano (crushed)
- 1 teaspoon chili powder
- 1 cup shredded cheese (cheddar or Mexican cheese blend)
- 2 green onions, chopped
For Assembly:
- 6 large flour tortillas
- 3 tablespoons oil (vegetable or canola)
Optional Toppings:
- Salsa
- Sour cream
- Guacamole
Substitution Notes: I’ve used rotisserie chicken, leftover grilled chicken, even those frozen chicken strips my kids eat. Doesn’t matter. No refried beans? Mash up regular ones with a fork. I’ve used whatever cheese was in the fridge – cheddar, Mexican blend, even string cheese torn up when I was desperate.
Why These Ingredients Work
The beans are basically edible glue. They hold everything together so you don’t have chicken chunks falling out everywhere. Trust me, I tried making these without beans once and it was a disaster.
Salsa keeps it from being dry and flavorless. I use the medium stuff from Pace because that’s what I always have. My kids think anything spicier will kill them.
Those spices make it taste like actual Mexican food instead of just chicken mush. I eyeball them mostly. Sometimes I add more cumin if I’m feeling fancy.
Cheese is cheese. It melts and makes kids happy. Green onions make me feel like I added vegetables so I’m not completely failing as a mother.
Essential Tools and Equipment
You need a big bowl to mix stuff in. I use the same one I make pancake batter in on weekends.
Sharp knife for chopping chicken, but honestly I usually just shred it with my hands because I’m impatient.
If you’re frying them, use a pan that’s wide enough so they’re not squished together. I learned this when I tried cramming four in my small pan and they all stuck to each other.
For baking, just use a regular cookie sheet. I line mine with foil because I hate scrubbing baked-on cheese off pans.
How To Make Chicken Chimichangas
Step 1: Cook the Chicken
If you’re starting with raw chicken, just cook it however. I usually throw it in a pan with some salt and cook it until it’s not pink anymore. Nothing fancy.
Most of the time I use rotisserie chicken because I’m lazy and it’s already cooked. Just pull the meat off and shred it up. The kids like bigger chunks so I don’t go crazy making it perfect.
Step 2: Mix the Filling
Dump everything in your bowl. Chicken, beans, salsa, cheese, green onions, all the spices. Stir it around until it looks mixed.
I usually stick my finger in and taste it at this point. Sometimes it needs more salsa, sometimes more cheese. Depends on what kind of day I’m having.
The mixture should stick together but not be soupy. If it’s too wet, throw in more cheese. If it’s too dry, add more salsa. There’s no exact science here.
Step 3: Assemble the Chimichangas
This is the annoying part but you’ll figure it out. Put maybe half a cup of filling right in the middle of each tortilla. Don’t go nuts with the filling or they’ll explode when you cook them. I learned this the messy way.
Fold the bottom up first, then the sides, then roll it up tight. Try to keep the seam on the bottom so it doesn’t unroll itself.
If your tortillas are being jerks and cracking, microwave them for like 20 seconds first. My mom taught me this and it actually works.
Step 4: Choose Your Cooking Method
I usually bake them because frying makes my kitchen smell like oil for three days and I’m too old for that nonsense. But fried ones are crispier if you care about that.
Baked Version: Oven to 400 degrees. Put them on a cookie sheet seam-side down so they don’t fall apart. Brush oil all over them – don’t skip this part or they’ll be sad and not crispy.
Bake for maybe 25 minutes until they look golden. I check them at 20 minutes because my oven runs hot and burns everything.
Pan-Fried Version: Heat oil in your pan over medium heat. Not too hot or the outside burns before the inside heats up. Put them in seam-down first.
Don’t try to flip them right away or they’ll fall apart. Let them get golden on one side first, then turn them. Takes maybe 8 minutes total if you keep turning them.
Step 5: Serve
Serve them while they’re hot. We put out bowls of salsa, sour cream, and guacamole. Sometimes I make rice if I’m feeling ambitious, but usually they’re filling enough by themselves.
Let them sit for a minute before biting into them unless you want to burn your tongue. The filling gets ridiculously hot and I always forget this.

You Must Know
Don’t let the filling sit around forever before rolling them up. The tortillas get soggy and tear when you try to roll them. Ask me how I know this.
Personal Secret: Microwave the tortillas for 20 seconds before filling them. Game changer. They roll up so much easier and don’t crack. I don’t know why this works but it does.
Pro Tips & Cooking Hacks
Roll them tight but don’t hulk-smash them or the tortilla rips. It’s like wrapping a present – firm but gentle.
When you’re frying them, don’t flip too early. I know you want to peek but let them get golden first or they’ll stick to the pan and make a mess.
Don’t overstuff them. I know it’s tempting to use all the filling but less is more here. You want to actually be able to roll them up.
Make extra and freeze them. Wrap each one in plastic wrap and throw them in a freezer bag. Future you will thank present you when you’re staring at the fridge at 5 PM with no dinner plan.
Flavor Variations & Suggestions
Spicy Version: Add chopped jalapeños if your family can handle it. Mine cannot. I tried once and Jake acted like I was trying to poison him.
Veggie Version: I sometimes sauté bell peppers and onions and throw them in. The kids don’t notice if there’s enough cheese. Corn kernels work too.
Southwest Style: Black beans and corn make them more filling. I use the frozen corn because canned corn is weird and mushy.
Buffalo Style: Use buffalo chicken instead. Add some ranch packet powder to the filling. Kids lose their minds for this version.
Breakfast Version: Scrambled eggs, sausage, hash browns. Make them Sunday morning when you have time to deal with the mess.
Make-Ahead Options
You can roll these up and stick them in the fridge for a day or so before cooking. Just cover them with plastic wrap so they don’t get crusty.
For freezing, wrap each one individually in plastic wrap then throw them all in a freezer bag. Write the date on it because frozen mystery food is depressing.
Cook them straight from frozen but add like 10 more minutes. I make double batches sometimes when I’m already making the mess anyway.
Recipe Notes & Baker’s Tips
Getting the filling right takes a few tries. Too wet and the tortillas fall apart. Too dry and nobody wants to eat them. You’ll figure out what works for your family.
Rolling them gets easier with practice. My first ones looked like sad burritos that gave up on life. Now they actually look decent.
If you’re frying them, medium heat is your friend. High heat burns the outside before the inside gets warm. Low heat makes them soggy instead of crispy.
Serving Suggestions
These are pretty heavy so I don’t usually make much else. Sometimes rice if I feel like washing another pot. A salad if I’m pretending to be healthy.
The kids always want extra sour cream and more cheese. I just put everything in bowls and let them go nuts. Makes them feel fancy.
Good for when people come over too. Make a big batch and everyone thinks you actually know how to cook. Don’t tell them how easy it was.
How to Store Your Chicken Chimichangas
Room Temperature: Don’t leave them sitting out for hours. They have cheese and chicken so they’ll go bad. Two hours max.
Refrigerator: Stick them in a container with a lid for up to three days. They reheat okay but not as crispy.
Freezer: Wrap individually in plastic wrap and freeze for months. I’ve had them in there for like six months and they were still fine.
Reheating: Oven at 350 for maybe 15 minutes from the fridge, longer if frozen. Microwave makes them gross and soggy. Don’t do it unless you’re desperate.
Allergy Information
Contains: Wheat from tortillas, dairy from cheese. Maybe soy depending on what salsa you use. Check labels if you’re worried about it.
Gluten-Free: Use corn tortillas but they’re harder to roll without breaking. Or find those gluten-free flour ones at the store.
Dairy-Free: Skip the cheese or use fake cheese. Won’t be as good but still edible.
Lower Sodium: Use low-sodium everything. But honestly, sodium is what makes food taste good so don’t blame me if they’re bland.
Questions I Get Asked A Lot
Can I use corn tortillas instead?
Yeah but they crack easier. Heat them up good first. They’re smaller too so use less filling or you’ll have a mess.
Can I air fry these?
Sure. 380 degrees for maybe 10 minutes. Flip them halfway through. They get pretty crispy this way.
What’s the difference from a burrito?
These are cooked until crispy. Burritos are just soft. Same idea, different execution.
What if I don’t have green onions?
Skip them. Nobody will die. Or use regular onions chopped really small. Or just ignore that part completely.
How do I keep them from falling apart?
Roll them tighter and don’t stuff them too full. Keep the seam down when you cook them. Practice makes perfect.
💬 Did you try this? Let me know if your kids actually ate them or if they complained the whole time like mine sometimes do.


