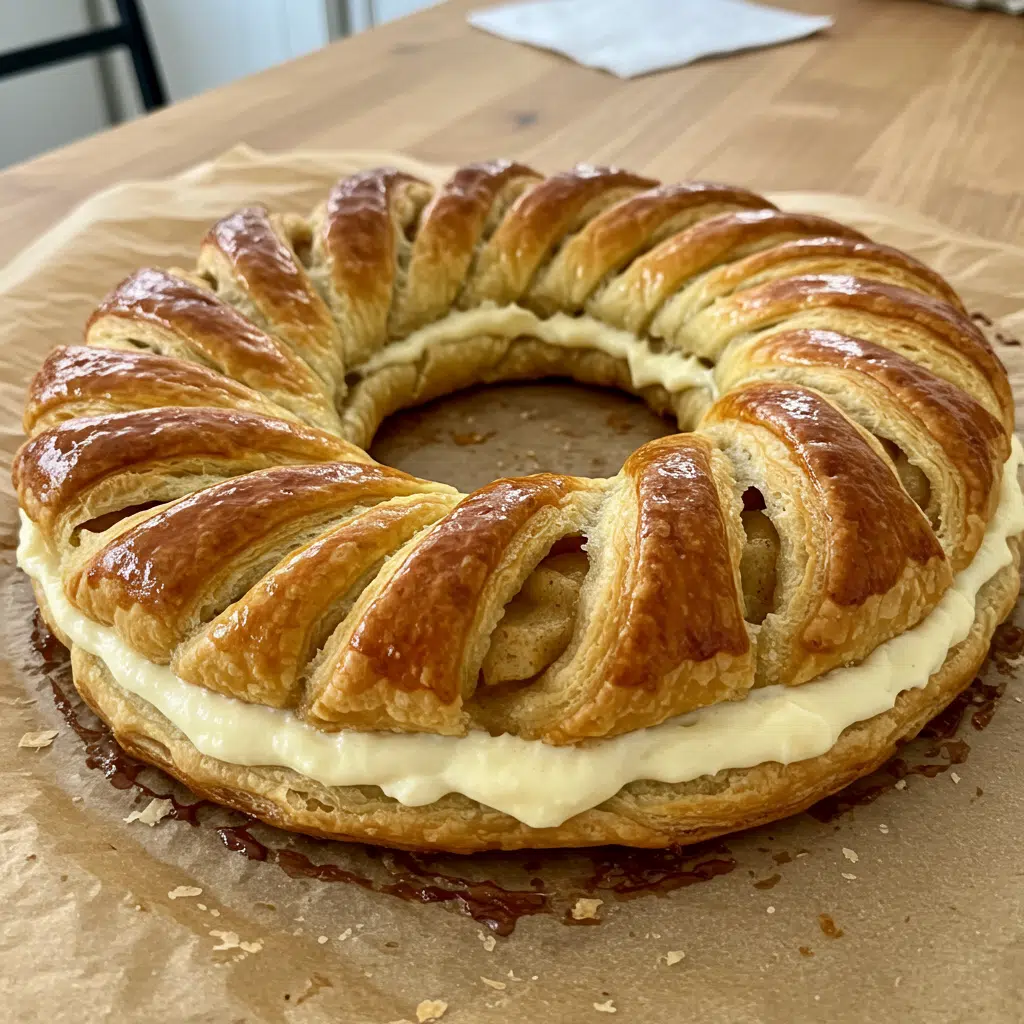
This Puff Pastry Apple Ring is a quick and delicious treat perfect for any occasion. Buttery, flaky puff pastry wraps around sweet, tender apple slices coated in cinnamon sugar, then bakes to golden perfection. Each bite tastes like apple pie in a light, airy pastry shell.
Love More Apple Recipes? Try My Mini Apple Pies With Puff Pastry or this Mini Apple Tarts next.

Why You’ll Love This Recipe
Ready in under 35 minutes with just five simple ingredients, these buttery, flaky pastries have a soft, sweet apple slice in the center. Delicious on their own or dipped in melted cookie butter, they make a perfect appetizer or dessert. Serve warm with a scoop of vanilla ice cream for an irresistible treat that’s so easy to make, you’ll want them every week.
Print
Apple Puff Pastry Ring
- Total Time: 35 minutes
- Yield: 4-6 individual pastries
Description
Easy Apple Puff Pastry Rings made with store-bought puff pastry wrapped around fresh apple slices, brushed with egg wash, and sprinkled with cinnamon coconut sugar. Baked until golden and flaky for a beautiful breakfast or dessert.
Ingredients
For the Apple Puff Pastry Rings:
- 1 sheet store-bought puff pastry (I use Pepperidge Farm – thaw it first)
- 1 big apple (Honeycrisp is my favorite but Granny Smith works too)
- 1 egg for brushing
- 2 tablespoons coconut sugar (or regular sugar, whatever)
- 1 teaspoon cinnamon
Instructions
Step 1: Get Everything Ready Turn your oven to 400°F and put parchment paper on a baking sheet. Do this first because once you start, everything happens fast.
Step 2: Cut Up the Apple Wash your apple and cut it into rings about as thick as your finger. Use a small knife to cut out the core – you want clean circles. One apple usually gives me 4-6 good rings.
Step 3: Deal with the Pastry Take the puff pastry out of the fridge now, not before. Roll it just enough to get rid of the fold marks. Cut strips about an inch wide – they need to wrap around your apple rings.
Step 4: Wrap Everything Up Take each apple ring and wrap a pastry strip around it. Overlap the pastry a little and tuck the ends under. Put them on your baking sheet with the tucked part on the bottom.
Step 5: Make Them Pretty Beat your egg in a bowl and brush it on each ring. Don’t be stingy here. Mix your sugar and cinnamon in another bowl and sprinkle it all over everything.
Step 6: Bake Them Put them in for 18-22 minutes until they’re golden brown and puffy. Check at 18 minutes because some ovens run hot.
Step 7: Try Not to Eat Them All Let them cool for 5 minutes, then eat them while they’re still warm. After 5 minutes I have no self-control left.
Notes
Slice carefully: Don’t push down hard with your knife or the apple cracks. Learned this after ruining half an apple.
Pastry too long? Cut it with scissors. Way easier than trying to roll it shorter.
No brush? Paper towel works fine for the egg wash. I do this all the time.
Bottom cooking too fast? Put another pan underneath. Saved my butt more than once.
- Prep Time: 15 minutes
- Cook Time: 20 minutes
- Category: Dessert, Breakfast
- Method: Baking
- Cuisine: American
Ingredient List
For the Apple Puff Pastry Rings:
- 1 sheet store-bought puff pastry (I use Pepperidge Farm – thaw it first)
- 1 big apple (Honeycrisp is my favorite but Granny Smith works too)
- 1 egg for brushing
- 2 tablespoons coconut sugar (or regular sugar, whatever)
- 1 teaspoon cinnamon
That’s literally it. I keep forgetting how short this list is until I write it out.
Why These Ingredients Work
Here’s why I stick with these specific things after making way too many batches:
Store-bought puff pastry – I tried making it from scratch exactly once and wanted to throw my mixer out the window. The frozen stuff works great and nobody can tell the difference.
Fresh apples – Has to be firm or you’ll end up with apple mush wrapped in pastry. I learned this lesson the hard way with some sad Red Delicious apples that turned into paste.
Coconut sugar – My neighbor suggested this and it’s become my thing. It gets all caramelly and makes people ask what I did differently. Regular sugar works fine if that’s what you have.
Cinnamon – Get the good stuff if you can. The cheap grocery store cinnamon tastes like dust and makes everything smell like a candle instead of actual food.
Egg wash – This is what makes them look like you bought them somewhere fancy instead of throwing them together in 15 minutes. Skip it and they look homemade in a sad way.
Essential Tools and Equipment
- Sharp knife (dull knives make apple slicing a nightmare)
- Rolling pin if your pastry needs smoothing
- Pastry brush or paper towel for egg wash
- Regular baking sheet
- Parchment paper (don’t skip this or you’ll be scraping)
- Small bowl for beating the egg
How To Make Apple Puff Pastry Ring
Step 1: Get Everything Ready Turn your oven to 400°F and put parchment paper on a baking sheet. Do this first because once you start, everything happens fast.
Step 2: Cut Up the Apple Wash your apple and cut it into rings about as thick as your finger. Use a small knife to cut out the core – you want clean circles. One apple usually gives me 4-6 good rings.
Step 3: Deal with the Pastry Take the puff pastry out of the fridge now, not before. Roll it just enough to get rid of the fold marks. Cut strips about an inch wide – they need to wrap around your apple rings.
Step 4: Wrap Everything Up Take each apple ring and wrap a pastry strip around it. Overlap the pastry a little and tuck the ends under. Put them on your baking sheet with the tucked part on the bottom.
Step 5: Make Them Pretty Beat your egg in a bowl and brush it on each ring. Don’t be stingy here. Mix your sugar and cinnamon in another bowl and sprinkle it all over everything.
Step 6: Bake Them Put them in for 18-22 minutes until they’re golden brown and puffy. Check at 18 minutes because some ovens run hot.
Step 7: Try Not to Eat Them All Let them cool for 5 minutes, then eat them while they’re still warm. After 5 minutes I have no self-control left.

Expert Tips
Keep that pastry cold! Room temperature pastry is a sticky mess that won’t puff right. If your kitchen’s warm, stick it back in the fridge for 10 minutes when it gets too soft to handle.
My secret trick: I brush melted butter on the apple rings before wrapping. Totally unnecessary but makes them taste crazy good. My sister keeps asking what I do different and I’m not telling her.
Pro Tips & Cooking Hacks
- Slice carefully: Don’t push down hard with your knife or the apple cracks. Learned this after ruining half an apple.
- Pastry too long? Cut it with scissors. Way easier than trying to roll it shorter.
- No brush? Paper towel works fine for the egg wash. I do this all the time.
- Bottom cooking too fast? Put another pan underneath. Saved my butt more than once.
Flavor Variations & Suggestions
- Caramel version: Drizzle store-bought caramel on top when they’re done
- Nuts: Chop up some pecans and sprinkle them with the cinnamon sugar
- Maple style: Use maple sugar instead of coconut sugar if you can find it
- Extra spicy: Add nutmeg or allspice to your cinnamon sugar
- Lemon twist: Put a tiny bit of lemon zest in the sugar mix
Make-Ahead Options
These taste best right out of the oven, but here’s what you can do:
Night before: Cut your apple and keep it in the fridge with a little lemon juice so it doesn’t turn brown. Mix up your cinnamon sugar.
Same day: Put them together and stick them in the fridge covered for up to 2 hours before baking.
Freezing: Make them completely and freeze on the baking sheet, then put in a bag. Bake straight from frozen but add 5 more minutes.
Recipe Notes & Baker’s Tips
- Apple type matters: Soft apples turn gross. Stick with Honeycrisp or Granny Smith.
- Don’t roll too thin: Thin pastry won’t puff up right. I ruined a whole batch learning this.
- Make rings the same size: Different thicknesses cook unevenly. Some burn while others stay raw.
- Know your oven: Mine has a hot spot on the right, so I turn the pan halfway through.
Serving Suggestions
These work for basically anything:
- Weekend breakfast with coffee and eggs (what I do most Saturdays)
- Kid snacks that they actually want to eat
- Book club when you want to look like you tried
- Quick dessert with ice cream when people come over unexpectedly
- Christmas morning when you want something special but easy
Eat them warm with powdered sugar, or go crazy with caramel sauce and whipped cream. Either way they disappear fast.
How to Store Your Apple Puff Pastry Ring
Counter: They’re best fresh but will keep covered for a day. They won’t be as crispy though.
Fridge: Covered for 3 days max.
Reheating: Put them back in a 350°F oven for 5-7 minutes to get the crispiness back. Don’t microwave them – they get soggy and weird.
Freezing after baking: Don’t do it. They get mushy when you thaw them.
Allergy Information
Contains: Wheat from the pastry, eggs from the wash Dairy: Most puff pastry has butter in it Nuts: None unless you add them Gluten-free: You can try gluten-free pastry but it won’t puff the same way No egg wash: Use milk or melted butter instead
Questions I Get Asked A Lot
Do apple and cinnamon really go together that well?
Come on, it’s apple and cinnamon. They’ve been a thing since forever. Like asking if chocolate and peanut butter work together.
Can you really use puff pastry with apples?
Yeah, French people have been doing this for centuries. The pastry stays crispy while the apple gets soft and sweet.
What if my puff pastry tears while wrapping?
Just smoosh it back together or stick a piece of pastry over the tear. Once it bakes you can’t tell.
Can I use regular sugar instead of coconut sugar?
Of course. Brown sugar, white sugar, whatever you have works fine. Coconut sugar just tastes a little different.
How do I know when they’re done?
They should be golden brown and sound hollow when you tap them. The pastry should be puffy, not flat.
My apple rings broke apart. What happened? Your apple was probably too soft or you cut the rings too thin. Use firm apples and cut them thick enough to hold together.
These Apple Puff Pastry Rings have become my go-to when I need something impressive but don’t have all day to spend in the kitchen. My teenage daughter now brings friends over specifically hoping I’ll make them, which honestly makes my heart happy.
Next time you have an apple sitting on your counter and want to create something special, give these a try. I promise you’ll be amazed at how something so simple can look and taste so incredible.
💬 Tried this recipe? Leave a comment and rating below! I’d love to hear about your favorite variations or any creative twists you discovered!

