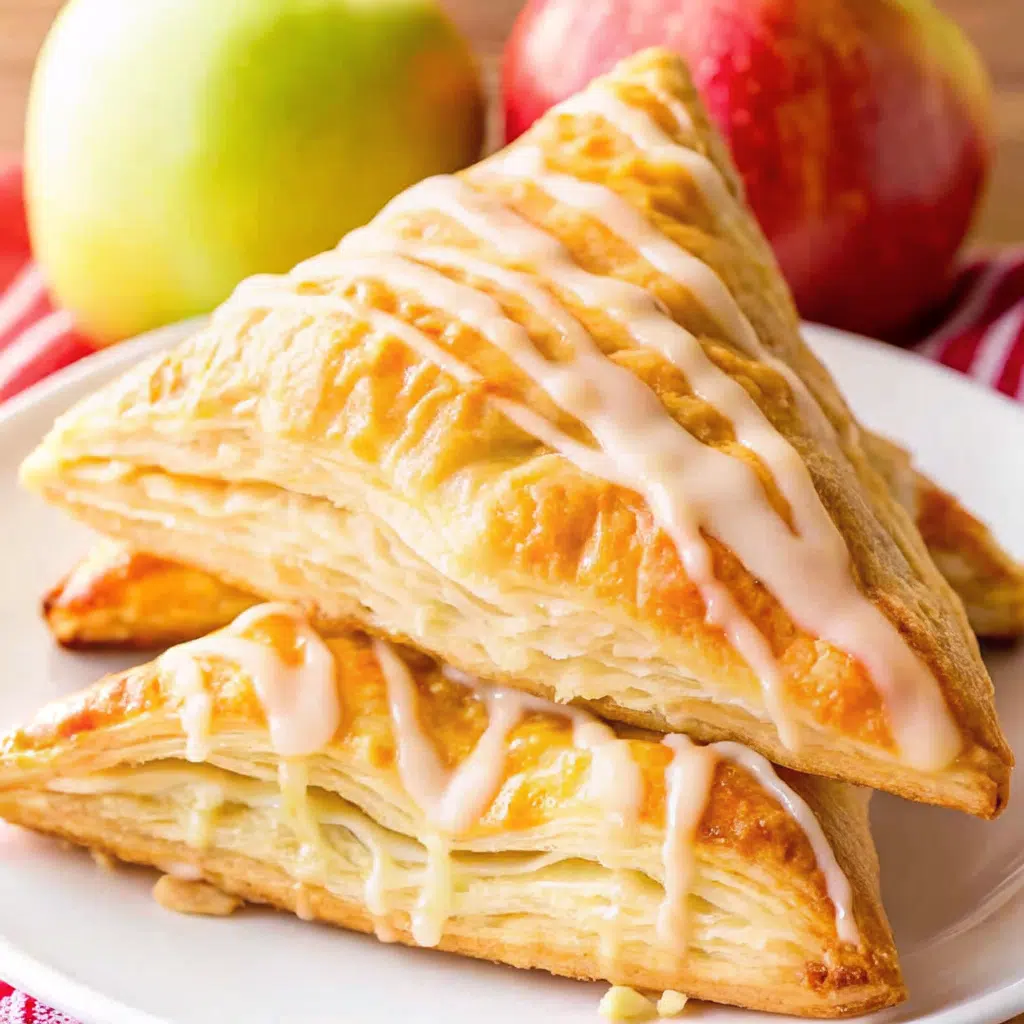
Puff pastry apple turnovers are flaky, golden pastries filled with a warm, gooey cinnamon-apple filling that tastes just like apple pie. They look bakery-worthy but are surprisingly easy to make with just a few simple ingredients and steps, making them perfect for a quick yet impressive dessert.
Love More Apple Puff Pastry Desserts? Try My Apple Puff Pastry Ring or this Mini Apple Pies With Puff Pastry next.

Why You’ll Love This Recipe
This recipe gives you all the flavor and beauty of homemade pastry with none of the fuss. The apples turn jammy and sweet inside while the puff pastry bakes into perfectly golden, flaky triangles. It’s a shortcut dessert that looks impressive, tastes incredible, and disappears the moment it hits the table.
Print
Easy Puff Pastry Apple Turnovers
- Total Time: 30 minutes
- Yield: 12 turnovers
Description
Easy puff pastry apple turnovers recipe featuring tender spiced apples wrapped in golden, flaky pastry. Ready in just 30 minutes using store-bought puff pastry and simple ingredients.
Ingredients
For the Apple Filling:
- 4 medium apples (Granny Smith, Jonagold, Honeycrisp, Braeburn, or Pink Lady), peeled and diced
- 3 tablespoons butter
- 1/3 cup brown sugar, packed
- 1 teaspoon ground cinnamon
- 1/4 teaspoon ground nutmeg
- 1 tablespoon cornstarch
- 1 tablespoon water
For the Turnovers:
- 2 sheets frozen puff pastry, thawed to room temperature
- 1 large egg
- 2 tablespoons water
- 2 tablespoons coarse sugar (optional, for sprinkling)
Instructions
Chop up those apples tiny – about the size of your pinky nail. Big pieces will tear holes right through your pastry, and that’s just embarrassing. Throw everything in a pan over medium heat and stir it around for maybe 5-7 minutes until the apples start getting soft.
Mix that cornstarch with water first – saves you from getting weird clumps later. Stir it in and watch everything thicken up real quick. Turn off the heat and ignore it completely while it cools. Hot filling equals melted pastry equals sad turnovers.
Heat up the oven to 400°F and stick parchment paper on a baking sheet. Trust me on the parchment – cleaning burnt pastry off metal is nobody’s idea of fun.
Roll out each sheet until it’s roughly 15×10 inches. Don’t stress about perfect measurements here – close enough works. Cut each sheet into 6 squares. You should end up with a dozen squares total. Keep them chilly or they’ll turn into a gooey mess.
Dump 2-3 tablespoons of cooled filling smack dab in the middle of each square. Don’t get greedy – my first batch looked like apple bombs went off in my oven because I stuffed them too full.
Fold each square corner to corner into triangles. Smoosh those edges down hard, then grab a fork and go nuts crimping them shut. Really mash them down – loose edges mean apple goop leaking everywhere during baking.
Line these up on your baking sheet with some space between each one – they need room to puff up and show off.
Beat up that egg with water and brush it all over the tops. This is what makes them look store-bought fancy instead of homemade wonky. Take a knife and poke two little holes in each one so steam can get out. Skip this and they’ll explode like little pastry grenades.
Stick them in the oven for 15-20 minutes until they puff up and turn golden brown. They should sound hollow when you tap the tops – kind of like knocking on wood.
Notes
Move fast once you start rolling – every minute that pastry sits out gets it closer to disaster. I prep everything first, then do an assembly line like I’m working at McDonald’s.
Less filling is always better than more. I stuffed my first batch like Christmas stockings and ended up with apple soup all over my oven floor. Those little steam holes aren’t suggestions – they’re requirements unless you like cleaning apple off your oven walls.
Never skip brushing them with egg. It’s what makes people think you bought them from some fancy bakery instead of throwing them together in your pajamas.
- Prep Time: 15 minutes
- Cook Time: 15 minutes
- Category: Dessert
- Method: Baking
- Cuisine: American
Ingredient List
For the Apple Filling:
- 4 medium apples (Granny Smith, Jonagold, Honeycrisp, Braeburn, or Pink Lady), peeled and diced
- 3 tablespoons butter
- 1/3 cup brown sugar, packed
- 1 teaspoon ground cinnamon
- 1/4 teaspoon ground nutmeg
- 1 tablespoon cornstarch
- 1 tablespoon water
For the Turnovers:
- 2 sheets frozen puff pastry, thawed to room temperature
- 1 large egg
- 2 tablespoons water
- 2 tablespoons coarse sugar (optional, for sprinkling)
Friendly Notes: Whatever apples are cheapest at the store work fine here. I’ve mixed Red Delicious with Granny Smith because that’s what was on sale. My kids can’t tell the difference anyway!
Why These Ingredients Work
Brown sugar gets sticky and caramelly when it hits that hot butter – way tastier than regular sugar. The cornstarch stops your turnovers from leaking apple juice everywhere (wish I’d known that for my first batch).
Store-bought puff pastry is a lifesaver. I tried making my own exactly once and ended up ordering pizza instead. Some battles aren’t worth fighting!
Essential Tools and Equipment
- Large skillet or saucepan
- Rolling pin
- Sharp knife
- Fork (for crimping edges)
- Large baking sheet
- Parchment paper
- Small bowl (for egg wash)
- Pastry brush
How To Make Puff Pastry Apple Turnovers
1. Prepare the Apple Filling
Chop up those apples tiny – about the size of your pinky nail. Big pieces will tear holes right through your pastry, and that’s just embarrassing. Throw everything in a pan over medium heat and stir it around for maybe 5-7 minutes until the apples start getting soft.
Mix that cornstarch with water first – saves you from getting weird clumps later. Stir it in and watch everything thicken up real quick. Turn off the heat and ignore it completely while it cools. Hot filling equals melted pastry equals sad turnovers.
2. Prep Your Puff Pastry
Heat up the oven to 400°F and stick parchment paper on a baking sheet. Trust me on the parchment – cleaning burnt pastry off metal is nobody’s idea of fun.
Roll out each sheet until it’s roughly 15×10 inches. Don’t stress about perfect measurements here – close enough works. Cut each sheet into 6 squares. You should end up with a dozen squares total. Keep them chilly or they’ll turn into a gooey mess.
3. Assemble the Turnovers
Dump 2-3 tablespoons of cooled filling smack dab in the middle of each square. Don’t get greedy – my first batch looked like apple bombs went off in my oven because I stuffed them too full.
Fold each square corner to corner into triangles. Smoosh those edges down hard, then grab a fork and go nuts crimping them shut. Really mash them down – loose edges mean apple goop leaking everywhere during baking.
4. Add the Finishing Touches
Line these up on your baking sheet with some space between each one – they need room to puff up and show off.
Beat up that egg with water and brush it all over the tops. This is what makes them look store-bought fancy instead of homemade wonky. Take a knife and poke two little holes in each one so steam can get out. Skip this and they’ll explode like little pastry grenades.
5. Bake to Golden Perfection
Stick them in the oven for 15-20 minutes until they puff up and turn golden brown. They should sound hollow when you tap the tops – kind of like knocking on wood.
Let them cool for at least 5 minutes before you bite into one. I know waiting sucks, but that filling is hotter than the surface of the sun right out of the oven. My tongue still remembers!

You Must Know
Don’t let that puff pastry get warm and floppy! Warm pastry is like trying to fold wet paper – it just falls apart and won’t puff up right. Stick it back in the fridge if it starts getting soft.
Personal Secret: I make huge batches of apple filling and freeze it in ice cube trays. Two cubes per turnover and I’m done with the hard part!
Pro Tips & Cooking Hacks
Move fast once you start rolling – every minute that pastry sits out gets it closer to disaster. I prep everything first, then do an assembly line like I’m working at McDonald’s.
Less filling is always better than more. I stuffed my first batch like Christmas stockings and ended up with apple soup all over my oven floor. Those little steam holes aren’t suggestions – they’re requirements unless you like cleaning apple off your oven walls.
Never skip brushing them with egg. It’s what makes people think you bought them from some fancy bakery instead of throwing them together in your pajamas.
Flavor Variations & Suggestions
Toss in some chopped walnuts if you want crunch, or dried cranberries for that fancy touch. My weirdest combo that actually works? Thin brie slices mixed in with the apples. Sounds gross, tastes amazing.
Kids love mini chocolate chips thrown in there. Makes it feel more like dessert than healthy fruit. A little maple syrup in the filling tastes like fall had a baby with heaven.
Make-Ahead Options
Weekend warriors, listen up! Make these completely and freeze them raw on a baking sheet. Once they’re solid, bag them up for up to 3 months. Bake them straight from frozen – just tack on 5-7 extra minutes.
The apple filling keeps for 3 days in the fridge too. So you can have fresh turnovers whenever you want without doing all the chopping again.
Recipe Notes & Baker’s Tips
Granny Smith apples stay firm and won’t turn to mush, but Honeycrisps make everything sweeter. Use whatever’s on sale – I mix different kinds all the time and nobody notices.
Thaw that pastry right – overnight in the fridge or about 30 minutes on the counter. You want it bendy but still cold to touch. Chop your apples the same size so they all cook at the same speed. Nothing worse than biting into a rock-hard apple chunk!
Serving Suggestions
You absolutely must serve these with vanilla ice cream – it’s not optional! The hot pastry with cold ice cream is pure magic. Sometimes I drizzle caramel sauce on top when I’m feeling extra fancy.
Perfect with coffee in the morning or as dessert after dinner. Serve them warm for best results – that’s when the pastry’s crispiest and the apples are all gooey and perfect inside.
Now these have become my go-to panic dessert whenever someone’s coming over unexpectedly. They make you look like you actually have your life together when really you’re just good at faking it!
Sending warm bowls and full hearts from mine to yours!
How to Store Your Puff Pastry Apple Turnovers
Room Temperature: Leave them covered for maybe 2 days tops Refrigerator: Airtight container keeps them good for a week
Freezer: These last 3 months frozen if you wrap them right
Reheating: Oven at 350°F for 5-10 minutes brings back the crispiness. Don’t microwave them – turns the pastry into rubber!
Allergy Information
Contains: Wheat, eggs, butter
Gluten-Free: Some stores sell gluten-free puff pastry now – not terrible No Dairy: Use plant butter for the filling and find dairy-free pastry No Eggs: Skip brushing them or use some plant milk instead
Questions I Get Asked A Lot
Can I make my own puff pastry?
You could, but why torture yourself? Life’s too short for homemade puff pastry when the store stuff works fine.
Mine exploded everywhere. What did I do wrong?
Probably overfilled them, didn’t seal the edges good enough, or forgot to poke holes on top. Maybe all three if you’re having a really bad day!
What about using pie crust instead?
Different animal entirely. Won’t puff up the same way, but it’ll still taste good.
How can I tell when they’re finished?
Golden brown all over and they sound hollow when you tap the top. Pastry should be puffed up and crunchy.
Can I prep these ahead of time?
Yep! Put them together and stick in the fridge for a day, or freeze them for later. Just add a few more minutes in the oven if baking from frozen.
💬 Tried this recipe? Leave a comment and rating below! I’d love to hear about your favorite apple combinations or any creative variations you tried.


