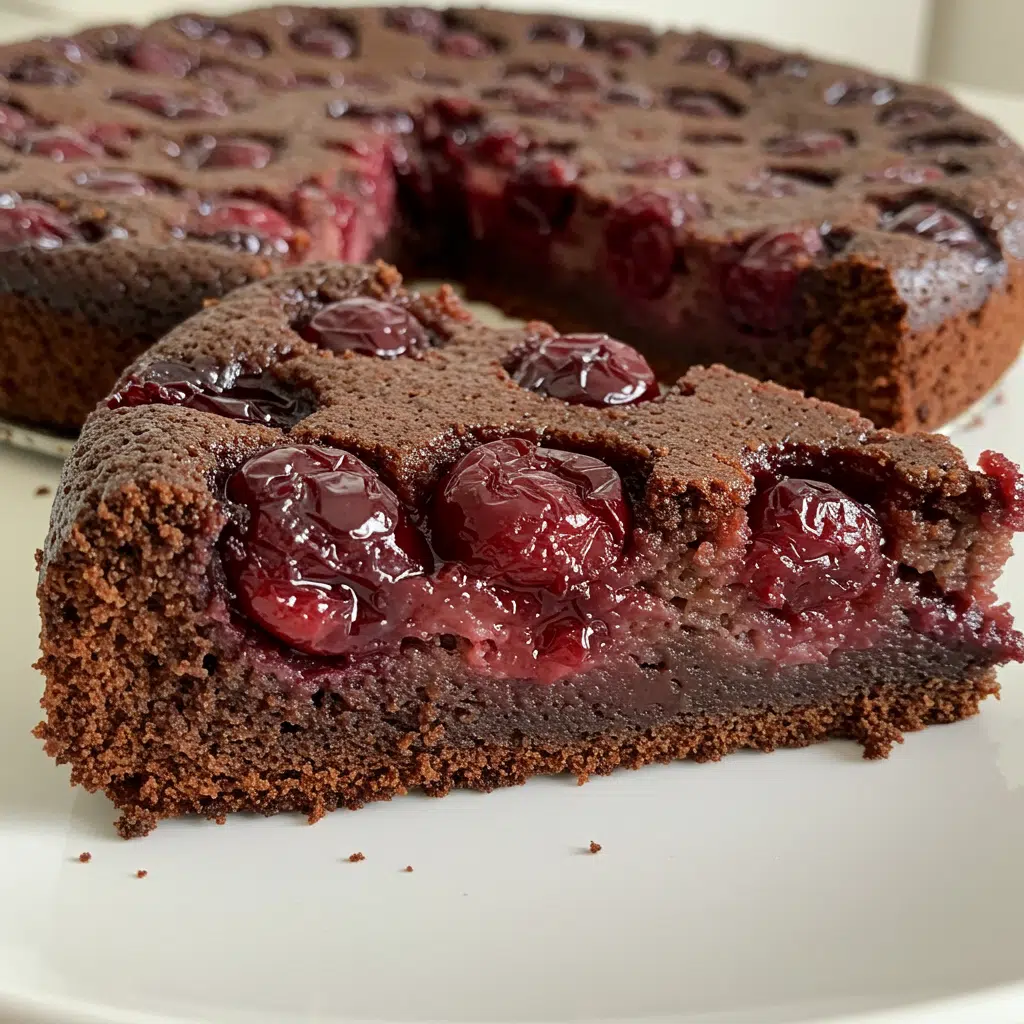
Chocolate Cherry Upside Down Cake is a quick and easy dessert that’s perfect for any occasion, even on busy weeknights. With sweet-tart cherries that caramelize beautifully on top and a rich, moist chocolate cake underneath, it’s a low-effort recipe that delivers big flavor. Ideal as a weekday treat or an impressive last-minute dessert for guests, it’s as simple to make as it is delicious.

Why You’ll Love This Recipe
Featuring a rich, moist chocolate cake topped with glossy, sweet-tart cherries, this upside-down dessert is as beautiful as it is delicious. The cherries create their own shiny, jewel-like topping while baking, giving it an elegant, bakery-quality look with minimal effort. Every slice delivers the perfect balance of deep chocolate flavor and bright cherry sweetness. It’s a recipe you’ll find yourself making again and again for both casual dinners and special occasions.
Print
Chocolate Cherry Upside Down Cake
- Total Time: 50 minutes
- Yield: 1 nine-inch cake
Description
An easy chocolate cherry upside down cake recipe featuring juicy cherries caramelized on top of moist chocolate cake, with optional chocolate ganache. Perfect weeknight dessert ready in 50 minutes.
Ingredients
For the Cherry Layer:
- 2 cups fresh or frozen pitted cherries (I grab whatever’s on sale)
- 1/3 cup granulated sugar
- 2 tablespoons cornstarch
- 2 tablespoons butter
For the Chocolate Cake:
- 1 1/3 cups all-purpose flour
- 1/2 cup unsweetened cocoa powder
- 1 cup granulated sugar
- 1 1/2 teaspoons baking powder
- 1/2 teaspoon salt
- 1/2 cup milk
- 1 tablespoon white vinegar (lemon juice works too)
- 1/3 cup vegetable oil
- 1 large egg
- 1 teaspoon vanilla extract
For Optional Chocolate Ganache:
- 1/2 cup heavy cream
- 1/2 cup chocolate chips
Instructions
- Set oven to 350°F and butter a 9-inch cake pan thoroughly, then dust with flour. I learned to be generous with both after my second cake stuck completely to the bottom.
- Mix milk with vinegar in a small bowl and leave it alone for 5 minutes while you prep everything else. It’ll look weird and curdled – that’s exactly what we want happening.
- Combine cherries, sugar, and cornstarch in a medium bowl until fruit is well-coated. Dot your prepared pan bottom with butter pieces, then spread cherry mixture evenly across.
- Whisk all dry ingredients together in your largest bowl, then mix wet ingredients in a separate bowl. Pour wet into dry and stir just until you don’t see flour streaks anymore – overmixing makes tough cake.
- Pour batter over cherries carefully and spread with a spatula. Don’t worry that it looks thin; it needs to flow around the fruit properly.
- Bake 30-35 minutes until the center springs back when you press it lightly. A toothpick should come out with just a few damp crumbs clinging to it.
- Cool exactly 5 minutes, then run a knife around edges and flip onto your serving plate in one confident motion. Leave the pan sitting on top for 2-3 minutes before lifting it off slowly.
Notes
Room temp eggs and milk mix way easier, but cold cherries actually hold their shape better when you bake them
That cornstarch isn’t optional – skip it and you get cherry soup on the bottom of your cake
Shake the pan gently before flipping. If the whole cake jiggles together, you’re good to go
Biggest mistake I see people make: letting it sit too long before the flip. Five minutes, then GO
- Prep Time: 15 minutes
- Cook Time: 35 minutes
- Category: Dessert
- Method: Baking
- Cuisine: American
Ingredient List
For the Cherry Layer:
- 2 cups fresh or frozen pitted cherries (I grab whatever’s on sale)
- 1/3 cup granulated sugar
- 2 tablespoons cornstarch
- 2 tablespoons butter
For the Chocolate Cake:
- 1 1/3 cups all-purpose flour
- 1/2 cup unsweetened cocoa powder
- 1 cup granulated sugar
- 1 1/2 teaspoons baking powder
- 1/2 teaspoon salt
- 1/2 cup milk
- 1 tablespoon white vinegar (lemon juice works too)
- 1/3 cup vegetable oil
- 1 large egg
- 1 teaspoon vanilla extract
For Optional Chocolate Ganache:
- 1/2 cup heavy cream
- 1/2 cup chocolate chips
When I’m out of stuff:
- Frozen cherries work great straight from the bag
- Got melted chocolate? Use 3 oz and cut back flour by 3 tablespoons
- Half-and-half makes decent ganache if you’re desperate
Why These Ingredients Work
My grandmother taught me that sour milk makes the fluffiest cakes, and she was absolutely right about this trick. When vinegar hits regular milk, it curdles slightly and reacts with baking powder to create extra lift in your chocolate cake. The cornstarch mixed with cherries isn’t fancy – it just soaks up the fruit juices so your bottom doesn’t turn soggy. I learned this the hard way after my first attempt resulted in a beautiful but mushy mess.
Essential Tools and Equipment
- 9-inch round cake pan (my beat-up aluminum one works fine)
- Big mixing bowl
- Whisk
- Measuring cups and spoons
- Small pot for ganache
- Cooling rack
- Plate bigger than your pan for flipping
How To Make Chocolate Cherry Upside Down Cake
- Set oven to 350°F and butter a 9-inch cake pan thoroughly, then dust with flour. I learned to be generous with both after my second cake stuck completely to the bottom.
- Mix milk with vinegar in a small bowl and leave it alone for 5 minutes while you prep everything else. It’ll look weird and curdled – that’s exactly what we want happening.
- Combine cherries, sugar, and cornstarch in a medium bowl until fruit is well-coated. Dot your prepared pan bottom with butter pieces, then spread cherry mixture evenly across.
- Whisk all dry ingredients together in your largest bowl, then mix wet ingredients in a separate bowl. Pour wet into dry and stir just until you don’t see flour streaks anymore – overmixing makes tough cake.
- Pour batter over cherries carefully and spread with a spatula. Don’t worry that it looks thin; it needs to flow around the fruit properly.
- Bake 30-35 minutes until the center springs back when you press it lightly. A toothpick should come out with just a few damp crumbs clinging to it.
- Cool exactly 5 minutes, then run a knife around edges and flip onto your serving plate in one confident motion. Leave the pan sitting on top for 2-3 minutes before lifting it off slowly.

Expert Tips
About flipping: Don’t chicken out here. Get a plate that’s bigger than your pan, flip it fast and confident. I’ve done this maybe fifty times now and only messed up twice when I got nervous and hesitated.
My weird trick: I always taste one cherry first. If they’re super sour, I throw in another tablespoon of sugar with the fruit. Nobody wants to pucker up at dessert time.
Pro Tips & Cooking Hacks
- Room temp eggs and milk mix way easier, but cold cherries actually hold their shape better when you bake them
- That cornstarch isn’t optional – skip it and you get cherry soup on the bottom of your cake
- Shake the pan gently before flipping. If the whole cake jiggles together, you’re good to go
- Biggest mistake I see people make: letting it sit too long before the flip. Five minutes, then GO
Flavor Variations & Suggestions
- Add a splash of rum or kirsch to the cherries if you’re feeling fancy
- Orange zest in the batter is amazing – just grate one orange
- Mini chocolate chips folded into the batter make my kids go crazy
- Swap cherries for raspberries or blackberries when cherry season’s over
- Cinnamon and a pinch of cardamom with the fruit tastes like Christmas
Make-Ahead Options
This cake gets better overnight – the flavors soak into each other and it’s even more delicious the next day. Just wrap it up in plastic wrap once it cools completely. You can make that ganache up to three days early too, just warm it up a little before you drizzle it on.
For the freezer: Wrap the whole thing tight and it’ll keep for months. Just thaw it on the counter overnight and nobody will know the difference.
Recipe Notes & Baker’s Tips
- Light-colored pans work way better than dark ones. Dark pans burn the bottom before the middle gets done
- Don’t drain any juice from your cherries – that’s where all the good flavor lives
- For ganache: heat cream until you see tiny bubbles around the edge, pour over chocolate chips, wait two minutes, then stir. Silky smooth every time
Serving Suggestions
Serve this warm with vanilla ice cream and watch people’s eyes roll back in their heads. For company, I add fresh whipped cream and that chocolate ganache drizzle – looks super professional. Also incredible with morning coffee the next day, assuming there’s any left (there never is).
How to Store Your Chocolate Cherry Upside Down Cake
Counter: Cover it up, lasts three days Fridge: Keeps a week if you cover it good Freezer: Wrap tight, good for months
Reheating: Twenty seconds in the microwave per slice, or stick the whole thing in a 300-degree oven for five minutes.
Allergy Information
Has: Wheat, eggs, dairy Dairy-free: Use plant milk and vegan butter – works fine Gluten-free: Swap in gluten-free flour blend, texture’s a bit different but still good
Questions I Get Asked A Lot
What about canned cherries?
Fresh or frozen taste way better, but if canned is all you got, drain them good and use less sugar since they’re already sweet.
Mine stuck to the pan, now what?
Don’t freak out! Just scrape off the stuck bits and stick them back on top. Still tastes amazing, just looks a little rustic.
Can I use a different size pan?
Eight-inch pan needs about ten more minutes in the oven. Ten-inch needs about ten minutes less. Just watch it.
How do I know it’s done?
Poke the center – it should bounce back. Toothpick should have just a few wet crumbs, not raw batter.
Can I make two at once?
Yep, just use two pans instead of trying to cram everything into one huge pan.
This recipe has become my go-to when I need something impressive but don’t want to stress about it. My neighbor asks me to bring it to every potluck now, and honestly, I’m not complaining because it means I get to eat it too.
💬 Made this cake? Drop a comment and let me know how it turned out! I love hearing about everyone’s tweaks and discoveries.


