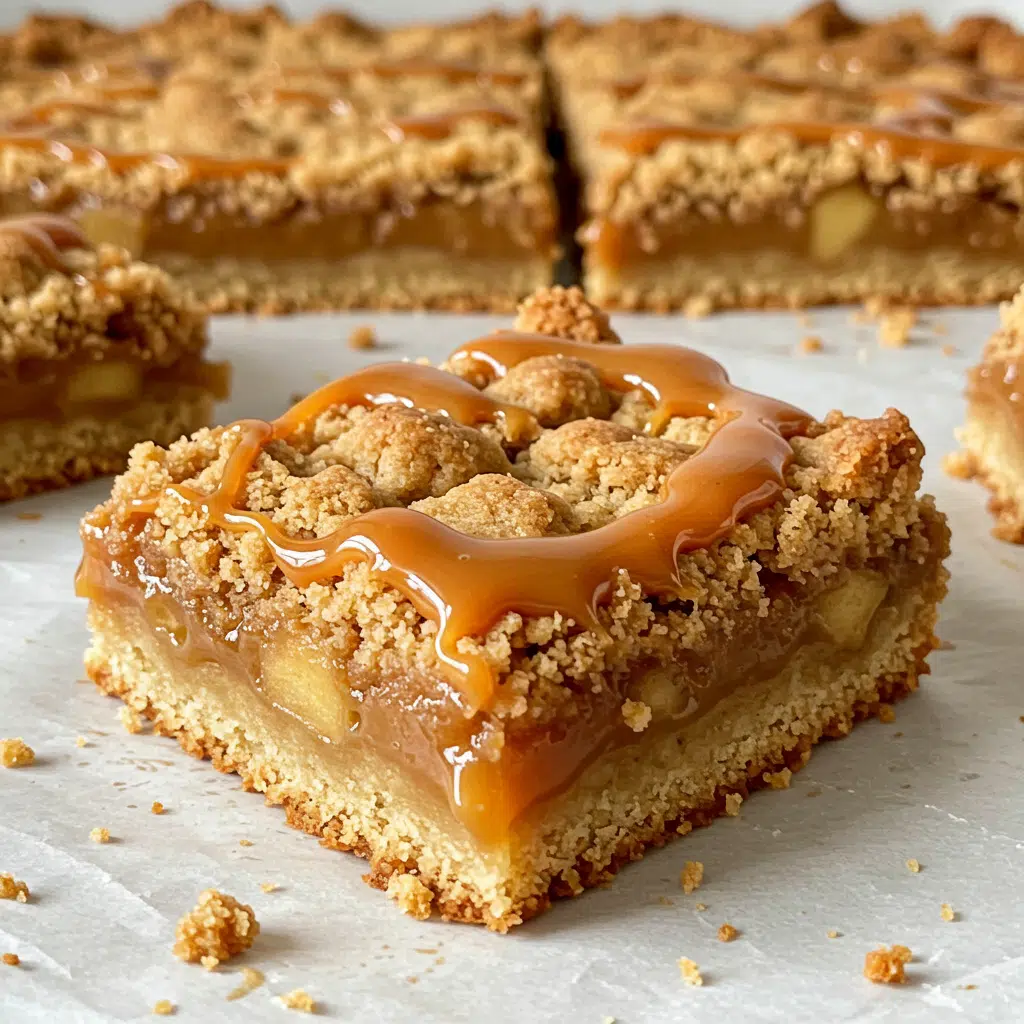
Easy homemade caramel apple crumb bars featuring tender cinnamon-spiced apples and rich caramel layered between a buttery brown sugar oat crust and a golden crumb topping. All the cozy flavors of classic apple crisp in a convenient handheld treat—made with simple pantry staples, endlessly adaptable, and perfect for fall baking.
Love More Apple Recipes? Try My Cinnamon Apple Cake or this Mini Apple Pies With Puff Pastry next.

Why You’ll Love This Recipe
A perfect harmony of textures and flavors—tender cinnamon-spiced apples layered with rich caramel, all nestled between a buttery, crisp crust and a golden, crumbly topping. Each bite captures the cozy warmth of apple crisp in an easy-to-enjoy form, with apples baked to tender perfection without turning mushy. It’s a true fall favorite made right at home.
Print
Caramel Apple Crumb Bars
- Total Time: 50 minutes
- Yield: 24 bars
Description
These Caramel Apple Crumb Bars feature a buttery oat crumble base, perfectly spiced apples, ribbons of melted caramel, and a golden crumb topping. Easy to make and absolutely irresistible – they taste like autumn in every bite!
Ingredients
Crust & Crumb Topping (same mixture, split in two)
- 1½ cups butter, melted and slightly cooled
- 1½ cups light brown sugar, packed
- 2 cups all-purpose flour
- 2 cups old-fashioned oats
- 1 teaspoon kosher salt
- 1 teaspoon baking soda
- 1 teaspoon cinnamon
- 1½ teaspoons vanilla extract
Apple Filling
- 3½ cups apples, peeled and diced (mix of Granny Smith and Gala)
- 1 teaspoon allspice
- 1 teaspoon lemon juice
- 2 tablespoons all-purpose flour
Caramel Layer
- 1 (10.8-oz) package Werther’s soft caramels (about 48 caramels)
- 3 tablespoons heavy cream
- ½ teaspoon vanilla extract
Instructions
Preheat your oven to 350°F and line that 9×13-inch pan with parchment paper. Leave some overhang on the sides – this makes lifting the bars out so much easier later, and you’ll thank me when it’s time to cut clean squares.
Mix the melted butter with brown sugar, flour, oats, salt, baking soda, cinnamon, and vanilla in a large bowl. Stir until it looks like chunky cookie dough. Now here’s important – divide this mixture in half and set one portion aside for the topping. Press the remaining half firmly into your prepared pan using the bottom of a measuring cup.
Toss your diced apples with lemon juice first (this stops them from browning), then add the allspice and flour. The flour soaks up extra apple juices so your bars won’t get soggy. Spread this mixture evenly over your pressed crust.
Put caramels and cream in a saucepan over medium-low heat. Stir constantly for about 3-4 minutes until smooth and glossy. Take it off the heat, add vanilla, and immediately drizzle over the apples while it’s still warm and pourable.
Sprinkle that reserved crumb mixture over everything. Don’t press it down – just let it fall naturally for the best texture.
Bake for 25-30 minutes until the edges are golden brown and the kitchen smells incredible. The center might still jiggle slightly, but it’ll set as it cools.
This is the hardest part – wait at least 30 minutes before cutting! Use the parchment overhang to lift the whole thing out, then cut into squares with a sharp knife.
Notes
Apple prep shortcut: Cut all your apples first, then toss with lemon juice right away so they don’t turn brown while you’re getting everything else ready.
Butter temperature: Let melted butter cool for 5 minutes before mixing it in. Too hot and it starts cooking the other stuff.
Crumb topping trick: Break up any big chunks with your hands when you sprinkle the final layer on top.
Done test: Look for golden brown edges. The middle can still wiggle a tiny bit – it firms up as it cools.
- Prep Time: 20 minutes
- Cook Time: 30 minutes
- Category: Dessert
- Method: Baking
Ingredient List
Crust & Crumb Topping
- 1½ cups butter, melted and slightly cooled
- 1½ cups light brown sugar, packed
- 2 cups all-purpose flour
- 2 cups old-fashioned oats
- 1 teaspoon kosher salt
- 1 teaspoon baking soda
- 1 teaspoon cinnamon
- 1½ teaspoons vanilla extract
Apple Filling
- 3½ cups apples, peeled and diced (mix of Granny Smith and Gala)
- 1 teaspoon allspice
- 1 teaspoon lemon juice
- 2 tablespoons all-purpose flour
Caramel Layer
- 1 (10.8-oz) package Werther’s soft caramels (about 48 caramels)
- 3 tablespoons heavy cream
- ½ teaspoon vanilla extract
Quick swaps: No Gala? Try Honeycrisp or Fuji. Out of Werther’s? Any bag of soft caramels works. Heavy cream missing? Whole milk does the job, just use a bit more if needed.
Why These Ingredients Work
The melted butter creates this amazing base that’s somewhere between a cookie and a shortbread – crispy on the edges but still tender in the middle. Brown sugar is my secret weapon here because it brings that deep molasses flavor that regular sugar just can’t match, plus it helps everything get gorgeously golden.
Those old-fashioned oats are crucial for the right texture – they keep their shape better than quick oats and give you that satisfying bite. The allspice in the apple mixture is what makes people ask “what’s that amazing flavor?” It’s warmer and more complex than just cinnamon alone. And honestly? Using Werther’s caramels instead of making caramel from scratch saves you time and stress while still giving you that perfect gooey layer.
Essential Tools and Equipment
- 9×13-inch baking pan
- Parchment paper
- Large mixing bowl
- Medium saucepan
- Wooden spoon
- Apple peeler or sharp knife
- Measuring cups and spoons
How To Make Caramel Apple Crumb Bars
Step 1: Prep Your Pan
Preheat your oven to 350°F and line that 9×13-inch pan with parchment paper. Leave some overhang on the sides – this makes lifting the bars out so much easier later, and you’ll thank me when it’s time to cut clean squares.
Step 2: Make Your Crumb Base
Mix the melted butter with brown sugar, flour, oats, salt, baking soda, cinnamon, and vanilla in a large bowl. Stir until it looks like chunky cookie dough. Now here’s important – divide this mixture in half and set one portion aside for the topping. Press the remaining half firmly into your prepared pan using the bottom of a measuring cup.
Step 3: Prep Those Apples
Toss your diced apples with lemon juice first (this stops them from browning), then add the allspice and flour. The flour soaks up extra apple juices so your bars won’t get soggy. Spread this mixture evenly over your pressed crust.
Step 4: Melt the Caramel
Put caramels and cream in a saucepan over medium-low heat. Stir constantly for about 3-4 minutes until smooth and glossy. Take it off the heat, add vanilla, and immediately drizzle over the apples while it’s still warm and pourable.
Step 5: Add the Final Touch
Sprinkle that reserved crumb mixture over everything. Don’t press it down – just let it fall naturally for the best texture.
Step 6: Bake Until Golden
Bake for 25-30 minutes until the edges are golden brown and the kitchen smells incredible. The center might still jiggle slightly, but it’ll set as it cools.
Step 7: Cool and Cut
This is the hardest part – wait at least 30 minutes before cutting! Use the parchment overhang to lift the whole thing out, then cut into squares with a sharp knife.

You Must Know
Get that caramel timing right! Don’t let it sit and cool down too much before you drizzle it over the apples. It needs to be warm and runny to spread nicely through the apple layer. If it gets thick, just reheat it for 30 seconds with a bit more cream.
My personal trick: I always peel the apples, even though some people skip this step. The peels can get chewy and weird in bars, plus they make the texture uneven. Spend the extra few minutes peeling – it’s worth it.
Pro Tips & Cooking Hacks
- Apple prep shortcut: Cut all your apples first, then toss with lemon juice right away so they don’t turn brown while you’re getting everything else ready.
- Butter temperature: Let melted butter cool for 5 minutes before mixing it in. Too hot and it starts cooking the other stuff.
- Crumb topping trick: Break up any big chunks with your hands when you sprinkle the final layer on top.
- Done test: Look for golden brown edges. The middle can still wiggle a tiny bit – it firms up as it cools.
Biggest mistake I see: People overbake these! They keep cooking after you take them out, so don’t wait for them to look completely set in the oven.
Flavor Variations
Add more spice: Try a pinch of nutmeg or cardamom with your apples. Ground ginger is really good too if you like that kick.
Go nutty: Throw ½ cup chopped pecans or walnuts into the crumb mixture before you divide it.
Chocolate version: Sprinkle mini chocolate chips over the caramel before adding the final crumble layer.
Citrus twist: Grate one lemon into your apple mixture. It makes the caramel taste even better.
Add cranberries: Mix ⅓ cup dried cranberries with the apples for extra tartness and pretty color.
Make-Ahead
These taste even better the next day after everything has time to settle together! Make the whole pan up to 2 days ahead and just cover and refrigerate.
Prep shortcuts: Mix your crumb topping and leave it covered on the counter for up to 24 hours. Cut and prep your apples (with the flour coating) up to 4 hours ahead and keep them in the fridge.
Freezer storage: Wrap cooled bars tight in plastic wrap, then foil. They’ll keep for 3 months frozen. Just thaw overnight in the fridge and they taste fresh.
Recipe Notes
Don’t overmix that crumb mixture – just stir until it comes together. Too much mixing makes the flour tough and you’ll end up with hard bars instead of tender ones.
Apple choices matter: I use half Granny Smith and half Gala because the Granny Smith gives you that tart bite to balance out the sweet caramel, while Gala apples stay nice and firm when they bake.
Caramel consistency check: Your melted caramel should coat a spoon but still pour easily. Too thick? Add cream one teaspoon at a time until it flows right.
Serving Suggestions
These are great on their own, but here’s how to make them extra special:
- With ice cream: Serve warm with vanilla or cinnamon ice cream on the side.
- Whipped cream: A dollop of fresh whipped cream with a pinch of cinnamon is really nice.
- Coffee pairing: These go great with hot coffee or chai tea for an afternoon treat.
- Breakfast treat: Yes, I eat these for breakfast sometimes with coffee!
- Party platter: Cut them smaller and put them on a tray with other fall desserts.
I really hope these become your new favorite fall dessert! There’s something about apples, caramel, and that buttery crumble that just feels like a hug on a plate.

How to Store Your Caramel Apple Crumb Bars
Counter storage: Keep them covered at room temp for 2 days max, though the caramel stays firmer when cold.
In the fridge: Store in a sealed container for up to 5 days. I actually like them better chilled because the caramel gets perfectly chewy.
Freezing: Wrap individual bars or the whole pan in plastic wrap, then foil. Good for 3 months frozen. Thaw in the fridge overnight.
Reheating: Pop single bars in the microwave for 10-15 seconds, or warm the whole pan in a 300°F oven for 5-10 minutes.
Allergy Information & Substitutions
Contains: Dairy (butter, cream), gluten (flour, oats)
Dairy-free: Use vegan butter and coconut cream instead of heavy cream. Check your caramels are dairy-free or make date caramel.
Gluten-free: Swap regular flour for 1:1 gluten-free flour blend, and use certified gluten-free oats.
Nut-free: This recipe has no nuts, but check your oats and caramels for facility warnings.
Questions I Get Asked A Lot
Can I use different types of apples?
Absolutely! Honeycrisp, Fuji, or Braeburn work beautifully. Just avoid Red Delicious or very soft apples that might get mushy. The mix of tart and sweet varieties gives the best flavor balance.
My caramel got too thick – help!
No worries! Just return it to low heat and whisk in cream one teaspoon at a time until it reaches that perfect drizzling consistency again.
Can I make my own caramel instead?
Of course! You’ll need about ¾ cup of homemade caramel sauce. Just make sure it’s not too thin, or it might make your bars soggy.
Why do my bars fall apart when I cut them?
Make sure you’re letting them cool completely – at least 30 minutes. Also, using parchment paper makes lifting and cutting so much easier!
Can I double this recipe?
Yes, but you’ll need to use two 9×13 pans. The bars won’t bake evenly in a larger, deeper pan.
Do I really need to peel the apples?
For the best texture, yes! Peeled apples create a more refined eating experience and let all those amazing flavors shine through.
💬 Tried this recipe? I’d love to hear how they turned out! Leave a comment and rating below – and don’t forget to share a photo! Tag me so I can see your beautiful creations and maybe share your success with other baking friends!


