Description
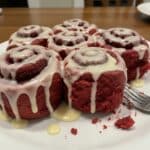
Soft, fluffy Red Velvet Cinnamon Rolls with warm cinnamon filling and luscious vanilla bean cream cheese frosting. Perfect for special breakfasts, brunches, or holidays. Make ahead overnight for easy morning baking!
Ingredients
For the Dough:
- 2.25 teaspoons (1 packet) active dry yeast
- 1/2 cup granulated sugar
- 1 cup whole milk, warmed to 110°F
- 1/2 cup unsalted butter, melted
- 2 large eggs, room temperature (seriously, don’t skip this)
- 4.25 cups all-purpose flour, plus more for dusting
- 3 tablespoons Dutch-process cocoa powder (regular works but color’s lighter)
- 1 tablespoon nonfat milk powder (trust me on this one)
- 1 teaspoon kosher salt
- 2-3 teaspoons red food coloring (liquid or gel)
For the Filling:
- 1/4 cup unsalted butter, softened to room temperature
- 1 cup dark brown sugar (light brown works too)
- 2 tablespoons ground cinnamon
- 1/4 teaspoon kosher salt
For the Vanilla Bean Cream Cheese Icing:
- 1/4 cup unsalted butter, softened to room temperature
- 4 ounces block-style cream cheese, softened to room temperature (not the spreadable tub kind)
- 1.5 cups powdered sugar, sifted if lumpy
- 1 tablespoon vanilla bean paste (or 2 teaspoons vanilla extract)
Yield: 12 generous cinnamon rolls
Instructions
Warm your milk to 110°F. I stick mine in the microwave for 45-50 seconds, but always check with a thermometer because too hot kills the yeast and too cold does nothing.
Mix the yeast, sugar, and warmed milk in your stand mixer bowl. Stir it once and walk away for 7-10 minutes. When you come back, it should be foamy and smell yeasty. If it’s still flat, your yeast is dead—toss it and start over with fresh.
Add the melted butter, eggs, flour, cocoa powder, milk powder, salt, and 2 teaspoons of red food coloring. Hook up your dough attachment and run it on medium for 6-8 minutes.
Watch for the dough to pull away from the bowl sides and get smooth. If it’s a sticky mess, add flour one tablespoon at a time. Want it redder? Toss in another teaspoon of coloring now.
No mixer? Knead by hand on a floured counter for 10 minutes. Your arms will feel it but it works fine.
Shape the dough into a ball and drop it in a greased bowl. Cover it tight with plastic wrap and a towel so it doesn’t dry out.
Stick it somewhere warm until it doubles—usually 1.5 hours. I put mine in the oven with just the light on. Works every time.
Punch down the dough (feels good, doesn’t it?) and dump it on a floured counter.
Roll it out to about 15×10 inches. Don’t stress about exact measurements. Just get it even so everything bakes right.
Spread the softened butter everywhere except a tiny border. I use my hands with gloves because it’s faster and more even than a spatula.
Dump the brown sugar on top and press it into the butter with your hands. Sprinkle the cinnamon and salt over everything. Pat it down gently so it sticks.
This is where it starts smelling incredible. You’re not allowed to eat it yet though.
Start from the long side (the 15-inch one) and roll it up tight. Keep the seam on the bottom and pinch it closed as you go.
If the ends look skimpy, cut them off. Each roll should be nice and full.
This is where dental floss saves the day. Slide it under the log, cross the ends on top, and pull. Clean cut, no squishing.
A sharp knife works too if you use a sawing motion. Cut 12 equal pieces. Mark them first if you want them all the same size.
Line your 13×9 pan with parchment and lay the rolls in cut-side up. Give them a little space.
Cover tight with plastic wrap and refrigerate 8-10 hours. They’ll rise slow in the cold and taste even better.
Doing same-day? Skip the fridge. Let them rise somewhere warm for 1-2 hours until puffy.
Pull the rolls from the fridge and let them sit out for 1-2 hours until they’re puffy and room temp.
Heat your oven to 350°F about 20 minutes before you’re ready to bake.
Peel off the plastic wrap and bake for 30 minutes. They’re done when the tops are light golden brown.
Your house is going to smell like a bakery exploded. Enjoy it.
While the rolls bake, beat the butter and cream cheese together until it’s fluffy—takes about 3-4 minutes. Don’t rush this part.
Add the powdered sugar slowly and beat until smooth. Mix in the vanilla bean paste last.
Too thick? Add a splash of milk. Too thin? More powdered sugar.
Let the rolls cool 5 minutes. You want them warm but not lava-hot or the frosting melts into nothing.
Spread the icing with an offset spatula. Be generous.
Notes
Measure your cuts before slicing. I eyeball 12 marks with a knife first. Makes them all the same size so they bake evenly.
Use a thermometer for the milk. 110°F is the sweet spot. Too hot kills yeast, too cold does nothing. This is why most homemade rolls fail.
Knead until it bounces back. Properly kneaded dough should be smooth, elastic, and slightly tacky. Poke it—if it slowly bounces back, you’re good. This builds the gluten that makes them fluffy.
Keep the end pieces. Roll them into mini bonus rolls or bake them as snacks. Nothing goes to waste.
- Prep Time: 30 minutes
- Cook Time: 30 minutes
- Category: Dessert
- Method: Baking
- Cuisine: American