Description
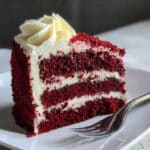
This classic red velvet cake recipe creates a tender, moist cake with the perfect subtle chocolate flavor and stunning red color. Topped with tangy cream cheese buttercream, it’s an impressive dessert that’s easier to make than you think!
Ingredients
Red Velvet Cake:
- 2.25 cups (275 g) all-purpose flour
- 3 tablespoons (18 g) cornflour (cornstarch)
- 3 tablespoons (14 g) unsweetened cocoa powder
- 1/2 teaspoon baking soda
- 1 teaspoon baking powder
- 1/2 teaspoon salt (omit if using salted butter)
- 6 tablespoons (86 g) unsalted butter, room temperature
- 3/4 cup (141 g) unflavored vegetable oil (such as canola)
- 1.75 cups (344 g) white granulated sugar
- 3 large eggs, room temperature
- 1 tablespoon (12 g) vanilla essence/extract
- 1.5 teaspoons white vinegar
- 3.5 tablespoons (38 g) red liquid food coloring
- 3/4 cup (158 g) buttermilk, room temperature
Cream Cheese Buttercream:
- 1 batch of cream cheese buttercream frosting (make 1.5x batch if piping rosettes like in the photos)
Instructions
Preheat your oven to 160°C (320°F) fan forced. If your oven doesn’t have a fan option, bump it up to 175°C (347°F). Grease and line two 8-inch cake pans with parchment paper. I like to grease the pans, add a parchment circle to the bottom, then grease again – this ensures your cakes will release perfectly!
In a bowl, sift together the flour, cornflour, cocoa powder, baking soda, baking powder, and salt. This step is important – sifting removes any lumps and aerates the flour for a lighter cake. Use a whisk or fork to mix everything together really well, then set it aside.
In another large bowl, add the butter, vegetable oil, and sugar. Using your electric mixer, cream them together for 2-3 minutes until the mixture is light, fluffy, and creamy. Don’t rush this step! Proper creaming incorporates air into the batter, which means a lighter, fluffier cake.
Add the eggs one at a time, mixing well between each addition – about 10-15 seconds per egg. This helps everything emulsify properly so your batter stays smooth and doesn’t separate. You’ll see the mixture get lighter and fluffier with each egg.
Add the vanilla, vinegar, and red liquid food coloring, and mix until everything is beautifully combined and evenly colored. Now set your mixer aside – we’re going low-tech from here to avoid overmixing!
Here’s where gentle hands make all the difference! Add half of your premixed dry ingredients to the wet mixture and gently fold it in with a spatula until just combined. Add all of the buttermilk and fold until just combined. Finally, add the remaining dry ingredients and fold gently until you can’t see any more flour streaks.
Important: Do NOT overmix! Overmixing develops gluten and makes the cake tough instead of tender. A few small lumps are totally fine.
Distribute the batter evenly between your two prepared 8-inch cake pans. A kitchen scale makes this super easy – just weigh each pan to make sure they’re equal! Bake for 30 minutes or until a toothpick inserted into the center comes out clean or with just a few moist crumbs.
Pro tip: Resist the urge to open the oven door before the 25-minute mark! Opening it too early can cause your cake layers to sink in the middle.
Let the cakes cool in their pans for 15-20 minutes. This cooling time helps them firm up so they won’t break when you remove them. Then turn them out onto a wire rack to cool completely before frosting. And I mean COMPLETELY cool – if there’s even a hint of warmth, your frosting will melt!
Once your cakes are completely cool, it’s decorating time! Place one layer on your serving plate, add a generous amount of cream cheese buttercream on top, and spread it evenly. Place the second layer on top, then frost the entire cake – top and sides.
If you’re feeling fancy and want to pipe rosettes like I do in the photos, you’ll need about 1.5x the frosting recipe. Use a 1M piping tip and pipe in a circular motion from the outside in. It looks impressive but it’s actually super easy!
Pop your beautifully decorated cake into the fridge to firm up – this makes slicing so much cleaner! Bring it out about an hour before serving to let it come to room temperature. Trust me, the flavor and texture are so much better when it’s not cold from the fridge.
Notes
- Use cake strips (or make DIY ones with wet towels and foil) around your pans for perfectly flat layers that don’t need trimming.
- Weigh your flour if you can! Too much flour is the #1 reason cakes turn out dry. Spooning and leveling works too, but weighing is most accurate.
- For the deepest red color, let your batter sit for 5 minutes after mixing. The color develops and deepens as it sits!
- Level your cakes with a serrated knife or cake leveler if they dome. But honestly, with the lower temperature, mine rarely need it.
- Common mistake to avoid: Don’t overmix once you add the flour! Mix just until you can’t see dry flour anymore, then STOP.
- Prep Time: 20 minutes
- Cook Time: 30 minutes + Cooling Time: 1 hour
- Category: Dessert
- Method: Baking
- Cuisine: American