Description
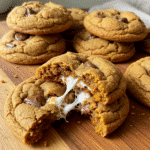
These soft, chewy Pumpkin S’mores Cookies feature pumpkin spice, gooey marshmallows, chocolate chips, and graham crackers in every bite.
Ingredients
Wet Ingredients:
- ½ cup unsalted butter, softened (leave it on your counter for an hour – don’t microwave it, trust me on this)
- ½ cup brown sugar (pack it down like you mean it)
- ¼ cup granulated sugar
- ⅓ cup pumpkin puree (the plain stuff, not pie filling – I made that mistake once)
- 1 large egg, room temp works best
- 1 teaspoon vanilla extract
- Optional: 2-3 drops orange food coloring (makes them look more fall-ish but totally skippable)
Dry Ingredients:
- 1½ cups all-purpose flour
- 1 teaspoon baking soda
- 1½ teaspoons pumpkin pie spice (or mix your own with cinnamon, nutmeg, ginger, and cloves)
- ¼ teaspoon salt
The S’mores Magic:
- 1 cup chocolate chips (semi-sweet or milk, whatever makes you happy)
- 1 cup mini marshmallows (mini ones spread better, regular ones just blob up)
- ½ cup graham cracker crumbs (smash about 4 full crackers in a bag with a rolling pin – therapeutic)
Instructions
Step 1: Crank your oven to 350°F and slap some parchment paper on your baking sheets. I used to skip this step until I spent twenty minutes with a spatula trying to save burnt cookie bottoms. Learn from my mistakes.
Step 2: Cream that butter with both sugars until it looks fluffy and pale. Takes about 4 minutes with my ancient hand mixer. If you’ve got a fancy stand mixer, lucky you – it’ll be done in half the time.
Step 3: Dump in the pumpkin, crack your egg, splash in vanilla, and add food coloring if you’re feeling fancy. Mix it up good. It’ll look kinda orange and weird, but roll with it.
Step 4: Whisk your dry stuff together in another bowl – flour, baking soda, spices, salt. Then slowly dump it into your wet mixture. Don’t go crazy mixing or you’ll get tough cookies. Nobody wants tough cookies.
Step 5: Now for the fun part – fold in all the good stuff. Chocolate chips, those tiny marshmallows, graham cracker bits. I always save some extras to stick on top because it makes them look like I actually know what I’m doing.
Step 6: Plop spoonfuls of dough on your sheets, give them some space to spread. Press those extra goodies on top. My kids love helping with this part – more ends up in their mouths than on the cookies, but whatever.
Step 7: Bake for 12-14 minutes. Edges should look set but centers still soft. They’ll finish cooking on the hot pan, so don’t panic if they look underdone.
Step 8: Let them sit on the pan for 5 minutes before moving them. This step saved me from cookie casualties – learned that one the hard way when half my batch crumbled trying to move them too fast.
Notes
- Chill your dough if it’s acting like wet cement – 30 minutes in the fridge fixes everything
- Parchment paper is non-negotiable – learned this after scraping cookies off pans with a spatula like some kind of barbarian
- Give cookies space – they need room to do their spreading thing
- Press extra goodies on top – because Instagram-worthy cookies are just better
- Prep Time: 15 minutes
- Cook Time: 15 minutes
- Category: Dessert
- Method: Baking
- Cuisine: American