Description
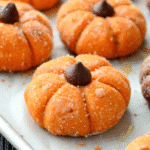
These Pumpkin Cheesecake Truffles combine cream cheese, pumpkin puree, and warm fall spices rolled into bite-sized balls and dipped in chocolate. They’re no-bake, make-ahead friendly, and taste just like pumpkin cheesecake in truffle form! Perfect for Thanksgiving, Halloween parties, or holiday gift-giving.
Ingredients
For the Truffle Filling:
- 8 oz cream cheese, softened (brick-style, not spreadable)
- 1/2 cup pumpkin puree (canned or homemade)
- 1 1/2 to 2 cups powdered sugar
- 1 1/2 teaspoons pumpkin pie spice (or 1 tsp cinnamon + 1/4 tsp nutmeg + pinch of cloves)
- 1 teaspoon vanilla extract
For the Coating:
- 12 oz chocolate chips (white, milk, or dark chocolate)
- 1 tablespoon coconut oil or vegetable oil (optional, for smoother chocolate)
Optional Toppings:
- 1/2 cup chopped pecans or walnuts
- 1/4 cup graham cracker crumbs
- Extra pumpkin pie spice for dusting
Instructions
Leave cream cheese on your counter for half an hour before you start. I take it out when I make coffee in the morning. Cold cream cheese is impossible to mix and you’ll get lumps no matter what you do. Put it in your bowl and beat it with the mixer until smooth. Maybe a minute.
Throw in pumpkin, spice, and vanilla. Mix until it’s all orange with no white. This is when your kitchen starts smelling good and your kids come asking what you’re making.
Start with 1 1/2 cups of sugar and mix on low unless you want a sugar cloud everywhere. Scoop some out and see if it holds together. Still sticky and wet? Add more sugar. Keep going until you can roll it without it sticking to your hands. Mine usually needs about 2 cups but depends on your pumpkin.
Cover it and put it in the fridge. Minimum 30 minutes but I do an hour because I’m impatient and want them perfect. I tried skipping this once and ended up with flat pancake things. Don’t skip it.
Line a baking sheet with parchment. Scoop out about a tablespoon and roll it between your hands. Keep going until it’s all rolled. When your hands get sticky, rinse them in cold water and dry them good. Then you can keep rolling without everything sticking.
Stick the whole tray in the freezer. Wait 15-30 minutes. This is the secret to not having them fall apart when you dip them. I’ve ruined whole batches by skipping this. Don’t be like me.
Microwave is easiest. Chocolate chips in a bowl, 30 seconds, stir. Another 30 seconds, stir. Keep going until almost melted then stir until smooth. Add the coconut oil and mix. Should look shiny and drip off your spoon easy.
Take like five balls out. Leave the rest frozen. Drop one in the chocolate, roll it around with a fork, lift it out. Tap the fork on the bowl edge so extra chocolate drips off. Put it back on the parchment. If you’re adding nuts or whatever, do it now before it hardens. Next ball. Keep going.
Back in the fridge for 30 minutes minimum until the chocolate is hard. Then move them to a container and keep cold.
Notes
Chocolate temperature matters! If your chocolate is too hot, it’ll melt the truffles as you dip them. Let it cool for a few minutes after melting—it should feel warm, not hot, to the touch.
Use a toothpick trick for smoother coating. Insert a toothpick into each frozen truffle before dipping. This gives you better control! After dipping, gently remove the toothpick and use a fingertip dipped in chocolate to smooth over the hole.
Prevent chocolate from seizing. If even one drop of water gets into your melting chocolate, it can seize up and get grainy. Make sure all your tools are completely dry! If it does seize, whisk in coconut oil, 1 teaspoon at a time, to smooth it out.
Make uniform balls with a cookie scoop. This ensures all your truffles are the same size, which means they’ll look professional AND they’ll be done chilling at the same time.
Work in batches. Only take a few truffles out of the freezer at a time to dip. If they sit at room temperature too long, they’ll get soft and harder to coat.
- Prep Time: 20 minutes
- Cook Time: Chill Time: 1 hour 15 minutes
- Category: Dessert
- Method: No-bake
- Cuisine: American