Description
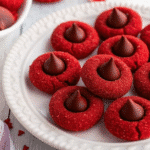
Easy red velvet cookies made with butter, cocoa powder, and red food coloring, rolled in festive red sanding sugar, and topped with Hershey’s chocolate Kisses. Perfect for Valentine’s Day, Christmas, or any celebration! These soft, chewy cookies require no chilling and come together in just 25 minutes.
Ingredients
For the Cookies:
- 7 tablespoons butter (salted or unsalted), softened
- ½ cup brown sugar
- 2 tablespoons granulated sugar
- 1 teaspoon vanilla extract
- 1 large egg yolk
- ¼ teaspoon red food coloring gel
- 1 cup all-purpose flour
- 1 tablespoon cocoa powder
- ½ teaspoon baking powder
- ¼ teaspoon salt
For Coating and Topping:
- ¼ cup red sanding sugar (for coating)
- 18 Hershey’s chocolate Kisses
Instructions
Turn your oven to 350°F and line a baking sheet with parchment paper. Unwrap all your Hershey’s Kisses now—seriously, do it before you start baking. You need to work fast when those cookies come out of the oven, and fumbling with foil wrappers while your cookies cool is not the move.
Throw your butter and both sugars in the mixer and beat them until they’re smooth—takes about two minutes. Scrape down the sides, then add your egg yolk, vanilla, and food coloring. Mix until everything’s combined and you’ve got this gorgeous red color going on.
Now dump in your flour, cocoa powder, baking powder, and salt. Mix just until you don’t see dry flour anymore. The dough will be soft and slightly sticky, which is exactly what you want.
Put your red sanding sugar in a small bowl. Use a tablespoon to scoop out dough—I usually get 18 cookies from this batch. Roll each scoop into a ball with your hands, then roll it around in that red sugar until it’s completely covered. Set them on your baking sheet with some space between them.
Bake for 10 minutes. The second you pull that pan out of the oven, start pressing Kisses into the center of each cookie. Work quickly but gently—you want them nestled in there but not squashing the whole cookie flat. Let them sit on the baking sheet for 10 minutes before you move them to a cooling rack. This part is important because they’re super delicate when they’re hot.
Notes
- Use gel food coloring, not liquid! Gel gives you that vibrant red color without adding extra moisture to your dough. Wilton makes the best red gel food coloring in my experience.
- Room temperature butter is your friend. Make sure your butter is softened but not melted. It should leave a slight indent when you press it with your finger.
- Don’t overbake! These cookies might look slightly underdone at 10 minutes, but they’ll continue cooking on the hot baking sheet. Overbaking will make them dry instead of soft and chewy.
- Work quickly with the Kisses. Have them unwrapped and ready before you even start baking. The second those cookies come out, you need to add the Kisses while they’re hot.
- The dough is super easy to work with – no adjustments needed! If it seems slightly sticky, that’s normal. It rolls beautifully between your palms.
- Prep Time: 15 minutes
- Cook Time: 10 minutes
- Category: Dessert
- Method: Baking
- Cuisine: American