Description
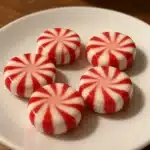
These no-bake Christmas Peppermints are the perfect holiday treat! Made with cream cheese, butter, powdered sugar, and peppermint extract, these soft, creamy candies have a firm outer shell and melt-in-your-mouth interior. Customizable with festive colors, they’re perfect for cookie trays, gift-giving, and holiday parties. Beginner-friendly and kid-approved!
Ingredients
Main Ingredients:
- ½ cup butter, softened (room temperature)
- 8 oz cream cheese, softened (room temperature)
- 4 cups powdered sugar (sifted recommended)
- ½ teaspoon peppermint extract (adjust to taste)
- Pinch of kosher salt
- Gel food coloring (red and green for Christmas theme)
- Granulated sugar for coating
Instructions
In a large mixing bowl, beat the softened cream cheese and butter together using an electric mixer on medium speed until smooth and fluffy, about 2-3 minutes. Scrape down the sides of the bowl as needed for even texture. You want this mixture to be completely smooth with no lumps—this is the foundation of your perfect mints!
Stir in the peppermint extract and a tiny pinch of salt. Start with ½ teaspoon peppermint and adjust to taste—peppermint extract is potent, so be careful not to overdo it. I learned this the hard way when I once added a full teaspoon and my mints were like eating straight toothpaste! Less is more here.
Gradually add the powdered sugar, 1 cup at a time, mixing on low speed. The mixture will start soft but gradually turn into a thick, dough-like consistency. Once too stiff for the mixer, switch to kneading by hand (dust hands with powdered sugar to prevent sticking). The final dough should be smooth, pliable, and not sticky. This is my favorite part—it’s like making edible Play-Doh!
Divide the dough into portions based on how many colors you want (traditionally white, red, and green). Add a drop or two of gel food coloring to each portion and knead until fully incorporated. Use gloves or knead on parchment paper to avoid staining hands. Pro tip: Leave one portion white for that classic Christmas contrast!
Dust a clean surface with powdered sugar. Roll each portion into a rope about ½ inch thick, then cut into bite-sized pieces (about ½ inch). For decorative options, roll each piece into a ball and press down slightly with a fork for a criss-cross pattern, or use small candy molds or cookie stamps. For a spiral effect, twist white and red logs together before shaping—so festive!
Roll each shaped mint in granulated sugar to coat the outside—this adds texture and prevents sticking. Place mints on a parchment-lined baking sheet in a single layer. Allow to air dry for 12-24 hours, uncovered, at room temperature.
Notes
- Avoid the Sticky Situation: Keep a small bowl of powdered sugar nearby while shaping. Dust your hands frequently to prevent the dough from sticking.
- Color Like a Pro: Start with just ONE drop of gel coloring. You can always add more, but adding too much creates muddy colors and can make the dough too soft.
- Consistent Sizes Matter: Use a ruler or bench scraper to measure your rope thickness and cut uniform pieces. This ensures even drying and professional-looking results.
- Common Mistake to Avoid: Don’t over-mix once the dough comes together. Over-working creates a tough texture instead of that tender, melt-in-your-mouth quality.
- Smart Shortcut: If you’re short on time, use a mini cookie scoop to portion the dough instead of rolling and cutting. It’s faster and creates perfectly uniform mints!
- Prep Time: 30-45 minutes
- Cook Time: Drying Time: 12-24 hours
- Category: Dessert
- Method: No-bake
- Cuisine: American