Description
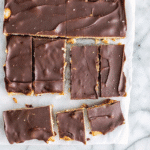
Christmas Crack is a three-layer candy featuring saltine crackers as the base, topped with homemade brown sugar caramel and finished with melted semi-sweet chocolate. This sweet and salty treat is perfect for holiday gifting and entertaining.
Ingredients
For the Base:
- 28-35 saltine crackers (about one sleeve; enough to line your tray)
For the Caramel Layer:
- 1 cup firmly packed dark brown sugar
- 1 cup (2 sticks) unsalted butter
- ¼ teaspoon kosher salt
- 1 teaspoon vanilla extract
For the Chocolate Topping:
- 2 cups chopped good-quality semi-sweet chocolate
Substitution Notes:
- Crackers: Club crackers work if that’s what you have, but saltines are my go-to
- Chocolate: Skip the chips and chop a bar instead – melts way better
- Brown sugar: Dark gives you that molasses flavor, but light brown works too
Instructions
Crank your oven to 400°F. Grab that jelly roll pan and line it with nonstick foil. Don’t have nonstick? Regular heavy-duty foil with a light spray works fine. Lay those saltines out in a single layer. They should fit pretty snug with just tiny gaps here and there.
Toss the brown sugar, butter, and salt into your saucepan. Medium heat is your friend here. Keep stirring while everything melts together. You’ll see it start bubbling and getting all golden. Once it’s boiling hard and the sugar’s completely dissolved – about 30 seconds of real boiling – yank it off the heat. Any longer and you’ll end up with weird grainy stuff.
Stir in that vanilla quick. It’ll bubble up like crazy but don’t panic. Now dump this gorgeous caramel mixture all over those crackers. Use your spoon to spread it around. It looks messy right now but the oven will fix that.
Five minutes in the oven. That’s it. You’ll see the caramel getting all bubbly and amazing. The smell alone will have people wandering into your kitchen asking what you’re making.
Pull it out and set a timer for exactly one minute. Not two, not thirty seconds – one minute. While you’re waiting, get that chocolate melting. Microwave in 30-second bursts, stirring between each one until it’s smooth and shiny.
Pour that melted chocolate right over the warm caramel. Spread it with your spatula, working fast. The slight warmth from the caramel helps everything spread like a dream.
Let it cool completely on the counter, then stick the whole thing in the fridge overnight. I know waiting is torture, but this step is crucial. Next day, lift it out using the foil edges, peel back the foil, and break it into chunks. Use a sharp knife or just go at it with your hands.
Notes
Get yourself organized before you start because once that caramel’s cooking, you’re committed. Have everything measured and ready to go. Don’t even think about multitasking during the caramel step – it goes from perfect to ruined in seconds.
The overnight fridge time isn’t optional. I tried rushing it once by sticking it in the freezer. Big mistake. The layers separated and it looked like a hot mess. Patience pays off here.
Use real vanilla extract, not the fake stuff. You can taste the difference, especially in something this simple where every ingredient matters.
- Prep Time: 15 minutes
- Cook Time: 10 minutes
- Category: Dessert
- Method: Baking
- Cuisine: American