Description
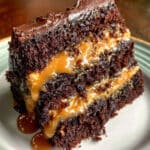
This stunning chocolate caramel cake features three layers of incredibly moist chocolate cake made with brown sugar, sour cream, and hot coffee for maximum flavor. Each layer is filled with luscious salted caramel and silky chocolate buttercream that’s infused with caramel. The finished cake is topped with a dramatic caramel drizzle and flaky sea salt for the perfect sweet-and-salty balance. It’s a bakery-quality dessert you can make at home!
Ingredients
For the Chocolate Cake Layers
- 2 cups granulated sugar
- 1 cup packed light brown sugar
- 2 ¾ cups all-purpose flour
- 1 ½ cups unsweetened cocoa powder (sifted)
- 3 teaspoons baking soda
- 1 ½ teaspoons baking powder
- 1 ¼ teaspoons salt
- 3 large eggs
- 2 large egg yolks
- 1 ½ cups full-fat sour cream
- ⅓ cup whole milk
- ¾ cup vegetable oil (or melted coconut oil)
- 2 tablespoons vanilla extract
- 1 ½ cups hot water (or hot coffee for stronger chocolate flavor)
For the Salted Caramel Chocolate Buttercream Frosting
- 2 cups (4 sticks) unsalted butter, very soft
- 4 ½ cups powdered sugar, sifted
- ¾ cup unsweetened cocoa powder, sifted
- 1 teaspoon vanilla extract
- ½ teaspoon salt
- 3 tablespoons heavy cream (more if needed)
- 2 tablespoons salted caramel sauce
For Garnish / Assembly
- About 1 ¼ cups salted caramel sauce (for filling and topping)
- Flaky sea salt, for sprinkling on top
Instructions
Preheat your oven to 350°F (177°C). Grease three 9-inch round cake pans generously with butter or non-stick spray, then line the bottoms with parchment paper circles. This double protection ensures your cakes release perfectly every single time!
In a large bowl, whisk together the granulated sugar, brown sugar, flour, cocoa powder, baking soda, baking powder, and salt. Make sure you sift that cocoa powder first — lumpy frosting is sad, but lumpy cake batter is even sadder! Give it a good whisk to combine everything evenly.
In another bowl, whisk together the eggs, egg yolks, sour cream, milk, oil, and vanilla extract until the mixture is smooth and unified. No streaks of sour cream should remain — this takes about a minute of good whisking.
Pour your wet mixture into the bowl with the dry ingredients. Use a rubber spatula or wooden spoon to mix gently until just combined. Don’t overmix here — a few small lumps are totally fine!
Here’s where it gets interesting! Add the hot water (or coffee) to your batter and mix until completely smooth. The batter will be THIN — almost pourable like a thick beverage. Don’t panic! This is exactly what we want. That liquid creates steam while baking, resulting in incredibly moist cake.
Divide the batter evenly between your three prepared pans. I like to use a kitchen scale for precision, but eyeballing works too. Each pan should be about two-thirds full.
Bake for 30 minutes, or until a toothpick inserted in the center comes out clean or with just a few moist crumbs. The tops should spring back when lightly pressed.
Let the cakes cool in their pans for 10 minutes on a wire rack — this prevents them from getting soggy bottoms. Then, carefully turn them out onto the rack to cool completely. This is crucial! Frosting warm cake = melted frosting disaster. I usually let mine cool for at least an hour, or I’ll pop them in the fridge for 30 minutes.
While your cakes cool, make the frosting. Beat the very soft butter in your stand mixer (or with a hand mixer) on medium speed for about 3 minutes until it’s smooth, pale, and fluffy.
Add the sifted powdered sugar and cocoa powder. Start on LOW speed (trust me on this — you don’t want a powdered sugar cloud in your kitchen). Once it’s incorporated, increase to medium speed.
Add the vanilla, salt, heavy cream, and those 2 tablespoons of salted caramel sauce. Beat until the buttercream is light, fluffy, and smooth — about 2-3 minutes. If it’s too thick, add cream by the tablespoon. Too thin? Add more powdered sugar.
Use a long serrated knife to carefully level the tops of each cake layer, removing any dome. This ensures stable stacking and professional-looking layers. Save those scraps — baker’s snack!
Place your first cake layer on a cake stand or serving plate. Spread a thin layer of buttercream on top (about ½ cup), then drizzle about ½ cup of salted caramel sauce over it. Don’t go all the way to the edges — leave about a ½-inch border.
Add the second layer and repeat: buttercream, then caramel.
Top with the third layer (place it cut-side down for a flat top). Now refrigerate the whole thing for 1 hour. This firms everything up and makes the final frosting coat SO much easier to apply.
Once chilled, frost the top and sides of the cake with the remaining buttercream. Start with a thin “crumb coat” if you want it extra neat, then apply a thicker final layer. An offset spatula is your best friend here!
Drizzle the remaining caramel sauce over the top of the cake, letting it drip down the sides dramatically. Finish with a generous sprinkle of flaky sea salt.
Notes
- Sift your cocoa powder and powdered sugar no matter how tempting it is to skip this step. Those little lumps will haunt you in the final cake and frosting.
- Use cake strips (those fabric strips you soak and wrap around pans) for perfectly flat layers that need minimal leveling. Game changer!
- Make your own caramel sauce if you’re feeling ambitious — homemade is always more delicious and you can control the saltiness.
- The one-hour chill is non-negotiable if you want clean, professional-looking slices. It firms up the caramel filling so it doesn’t squish out when you frost.
- Common mistake to avoid: Don’t overbake these cakes! They continue cooking slightly as they cool. Pull them when a toothpick has a few moist crumbs, not when it’s completely clean.
- Prep Time: 1 hour + Chill Time: 1 hour
- Cook Time: 30 minutes
- Category: Dessert
- Method: Baking
- Cuisine: American