Description
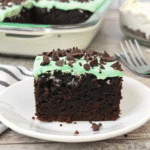
Andes Mint Poke Cake is a show-stopping dessert with layers of chocolate cake, hot fudge, chocolate pudding, and mint whipped cream topped with Andes candies. Easy, make-ahead friendly, and serves 12!
Ingredients
For the Cake Base:
- 1 box chocolate cake mix
- Ingredients listed on the cake mix box (typically 3 eggs, 1/2 cup oil, and 1 cup water)
For the Chocolate Filling:
- 1 jar hot fudge sauce (about 12–13 ounces)
- 1 package instant chocolate pudding mix (3.9 ounces)
- 2 cups cold milk
For the Mint Whipped Topping:
- 2 cups heavy whipping cream (cold)
- 1/3 cup granulated sugar
- 1/2 teaspoon mint extract
- Green food coloring (just a few drops)
For Garnish:
- 1 cup chopped Andes mint candies (plus extra for topping if you’re like me and can’t get enough!)
Instructions
Preheat your oven to 350°F and grease a 9×13-inch baking dish really well. I like to use baking spray with flour – it makes cleanup so much easier! Prepare your chocolate cake mix according to the package directions. Pour that beautiful batter into your prepared pan and bake for 20–25 minutes, until a toothpick inserted in the center comes out clean or with just a few moist crumbs.
Here’s where the magic happens! While your cake is still warm (this is IMPORTANT!), use the handle of a wooden spoon to poke holes all over the surface. I’m talking LOTS of holes – about 1 inch apart. Don’t be shy! The more holes, the more fudgy goodness gets inside.
Warm your hot fudge sauce in the microwave for about 30 seconds until it’s pourable but not scalding hot. Pour it evenly over the entire cake, using a spoon to help it find its way into all those holes. Let the cake cool completely at room temperature.
In a medium bowl, whisk together your instant chocolate pudding mix and 2 cups of COLD milk. Whisk vigorously for a full 2 minutes – this is crucial for getting that perfect thick consistency! Once it starts to thicken, immediately spread it evenly over your cooled cake. Pop the whole thing in the refrigerator for about 1 hour to let that pudding set up nice and firm.
In a large bowl (I chill mine first for best results!), pour in your cold heavy whipping cream. Using an electric mixer, beat on medium speed until soft peaks start to form. Gradually add the sugar and mint extract, then continue whipping until you get stiff peaks – the cream should stand up proudly when you lift the beaters!
Add just a few drops of green food coloring to your whipped cream. Start with 2–3 drops and gently fold it in until you reach that pretty mint-green color. You want it to look like Andes mints! Spread this gorgeous mint cloud evenly over your chilled pudding layer.
Sprinkle those chopped Andes mint candies generously over the top. I like to cover the whole surface – it looks beautiful and every bite gets that chocolate-mint crunch!
Refrigerate your cake for at least another hour before serving, or overnight if you’re making it ahead. The longer it chills, the better the flavors meld together!
Notes
- Poke hole pattern: I like to poke holes in a grid pattern so the fudge distributes evenly throughout.
- Fudge temperature matters: If your fudge is too hot, it can make the cake soggy. Warm, not boiling!
- Stabilized whipped cream: If you’re making this more than a day ahead, add 1 teaspoon of unflavored gelatin to your whipped cream to keep it from weeping.
- Skip the green: If you want it to look more elegant, leave the whipped cream white!
- Mint level control: Start with 1/4 teaspoon mint extract if you’re nervous. You can always add more, but you can’t take it away!
- Prep Time: 20 minutes
- Cook Time: 25 minutes + Chill Time: 2 hours
- Category: Dessert
- Cuisine: American